Building an online store can seem daunting, but with WordPress and WooCommerce, it’s easier than you might think. This guide will walk you through the steps to set up your WooCommerce website, even if you’re a beginner.
You’ll learn the five steps to build your eCommerce website with WordPress using the WooCommerce plugin. After reading this guide, you can set up any ecommerce functions on a WordPress Site.
Whether you want to integrate payment systems, check out carts, shipping, automated receipts, abandoned cart recovery email, etc, this guide shows how to build a functional ecommerce store from start to finish.
So, let’s jump in.
What is WooCommerce, and why is it so Popular?
WooCommerce is a free, open-source ecommerce plugin specifically designed for WordPress websites. It allows you to transform your WordPress site into a fully functional online store with features to manage products, inventory, payments, and shipping.
The plugin was originally released in 2011 before it was bought over by Automattic in 2015.
WooCommerce isn’t the only WordPress ecommerce plugin; there are other notable contenders like Marketpress, SureCart, Jigoshop, ShopWP, Ecwid, WPcommerce, etc., but WooCommerce has positioned itself as the go-to eCommerce plugin for WordPress.
Since its inception, the WooCommerce plugin has been downloaded more than 210 million times and currently powered over 4 million online stores on WordPress.
What’s more, here are a few reasons why WooCommerce is one of the top WordPress ecommerce plugins.
Ecommerce Functionality
- Product Management – Easily add, edit, and manage your products, including descriptions, images, pricing, variations (like size and color), and categories.
- Inventory Control – Track your product stock levels and set up low-stock notifications to avoid running out of popular items.
- Payment Gateways – Integrate popular payment gateways like PayPal, Stripe, and Authorize.Net to allow customers to purchase your products securely.
- Shipping Options – Configure various shipping methods and rates to offer flexibility and convenience to your customers.
- Tax Calculations – Automatically calculate and collect sales tax based on your and your customer’s locations.
Ease of Use
- WordPress Integration – Since it’s built for WordPress, WooCommerce leverages WordPress’s user-friendly interface. This makes setting up your online store easy, even with limited coding experience.
- Customization Options—WooCommerce offers a wide range of SEO-optimized and responsive themes. It also has WooCommerce extensions that allow you to personalize the look and feel of your online store. These extensions let you create a site that matches your brand identity and adds additional functionalities.
Scalability and Growth
- Free and Paid Extensions – The core WooCommerce plugin is free. Still, a vast ecosystem of paid and free extensions offers additional features like subscriptions, memberships, marketing integrations, and more. This allows you to scale your online store as your business grows.
- Open-Source Platform – Being open-source means developers can contribute to the core platform and create custom extensions. This gives you access to a constantly evolving platform with a large and supportive community.
How to Set up WooCommerce on WordPress
In this section of our WooCommerce tutorial, I will walk you through the step-by-step guides.
From setting up your WordPress site to installing the suitable ecommerce theme and the WooCommerce plugin and configuring the required features, every step you must take to succeed is discussed here.
So, let’s begin.
Setting Up WordPress
First, you need to set up your WordPress site. WooCommerce works with WordPress. So, if you don’t have a WordPress blog up and running already, you must follow this first step.
Get a WooCommerce hosting plan, register your domain name, and install WordPress. I have published a detailed tutorial on how to build a WordPress blog, which you can follow.
If you’re unsure which web host suits your WooCommerce site, here is a list of reliable web hosts offering WooCommerce-specific hosting plans. These hosts have hosting packages tailored to improve your WooCommerce site user experience.
Their hosting features help you build, scale, and manage your eCommerce business on WordPress much more easily.
Installing and Configuring WooCommerce – Set up Wizard
Next, you need to install the WooCommerce WordPress plugin.
As said earlier, WooCommerce is a WordPress plugin that integrates eCommerce features and functions into your WordPress blog. This lets you use WordPress to sell products and manage your eCommerce business.
Installing the plugin is straightforward and easier. If you’re unsure how to install a plugin, read this tutorial on how to install a plugin in WordPress, including WooCommerce.
Now that you know how to install plugins, it’s time to set up WooCommerce in WordPress.
Go to WordPress admin, click Plugin> Add Plugin from the side menu, and type WooCommerce into the search box.
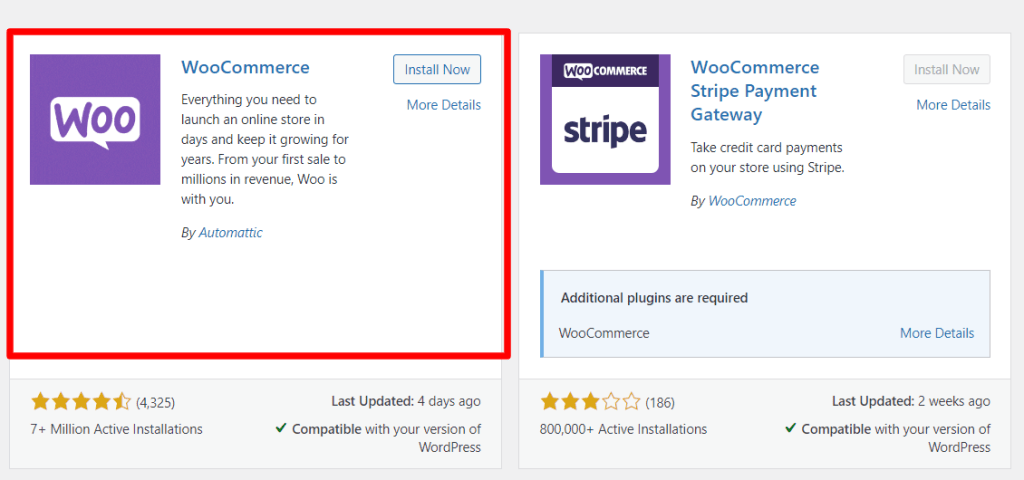
Install and activate the plugin.
Once installed and activated, you’ll be taken to the WooCommerce set-up page. As shown in the image below, you can skip the Setup Tutorial step if you know your way around WooCommerce or want to speed up the process.
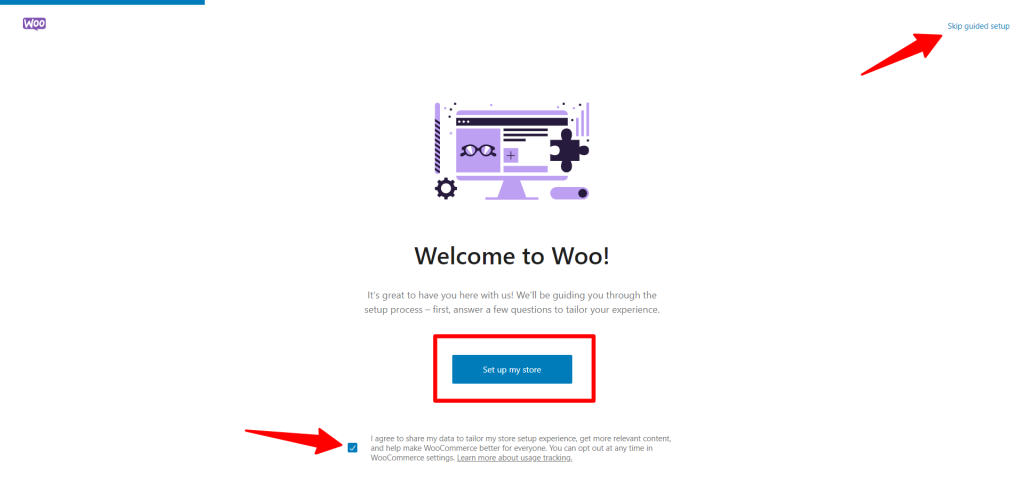
However, I advise you to click the “Set up my Store” button to allow WooCommerce to guide you through the process. You’ll need to answer questions about your ecommerce business and knowledge level.
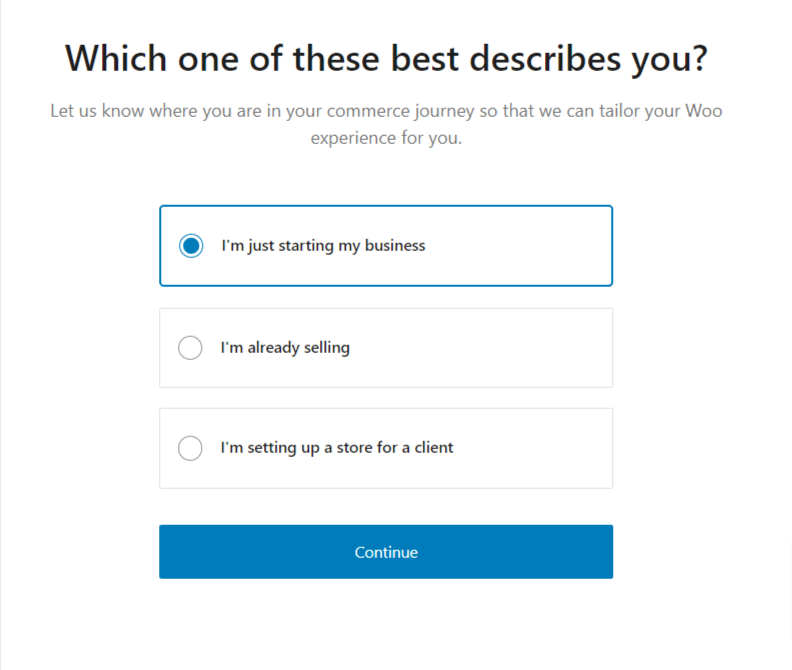
Answer the question to proceed and allow WooCommerce to tailor your store setup to your unique experience.
In the next screen, you must pay attention to a few questions in the WooCommerce setup wizard.
Selecting the right location is important because WooCommerce uses your store information to calculate the shipping and applicable taxes on the invoice. Therefore, you must enter the correct store information when creating a WooCommerce website in WordPress.
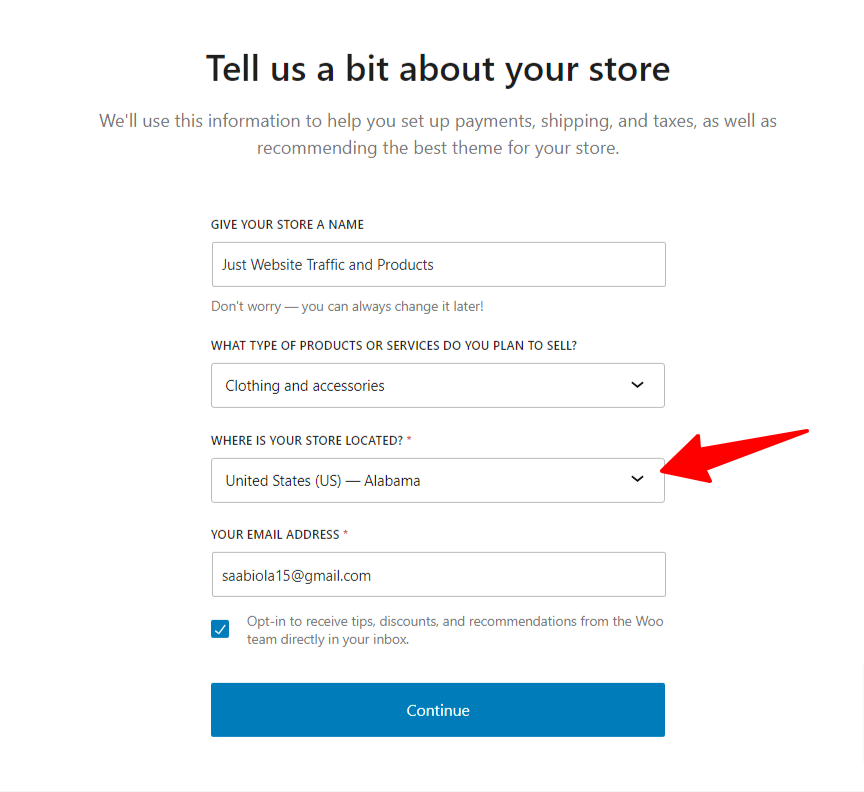
In a nutshell, here is the information you need to enter on this screen.
- Store name
- Type of products or services you plan to sell on your WooCommerce site.
- Your store location – Country and (state) – If available.
- Your email address
Next, WooCommerce recommends you install a few additional WooCommerce free plugins. You can uncheck or continue to install these plugins; There is no condition to install them if you don’t want to.
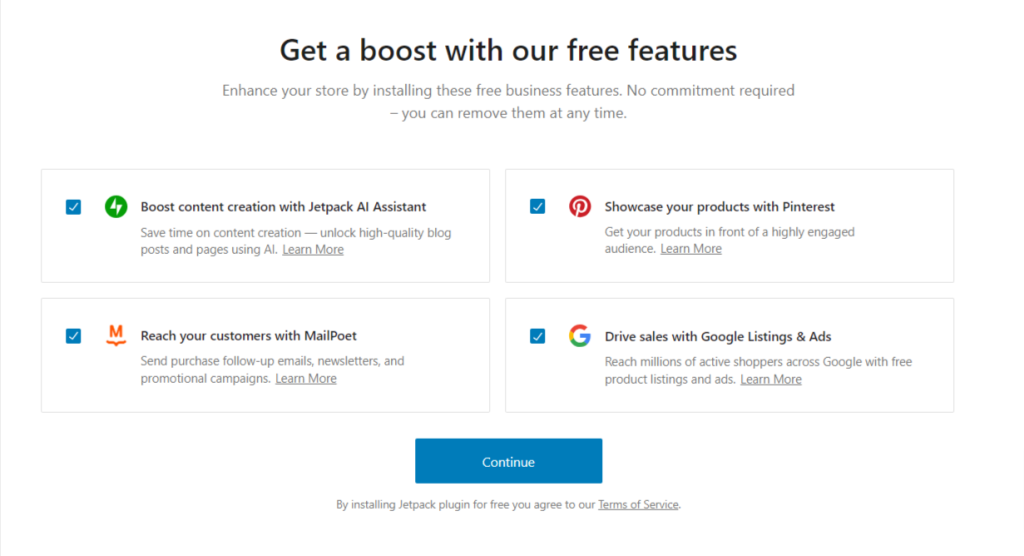
Clicking the continue button takes you to the final step in the WooCommerce setup wizard, which is this page.
It might take a few minutes for this process to finalize. So, give it some time to allow WooCommercce to complete the setup.
Customizing Your Store
After a few minutes, the WooCommerce setup wizard will be complete. Then, you will be redirected to your WordPress site’s WooCommerce customizer page.
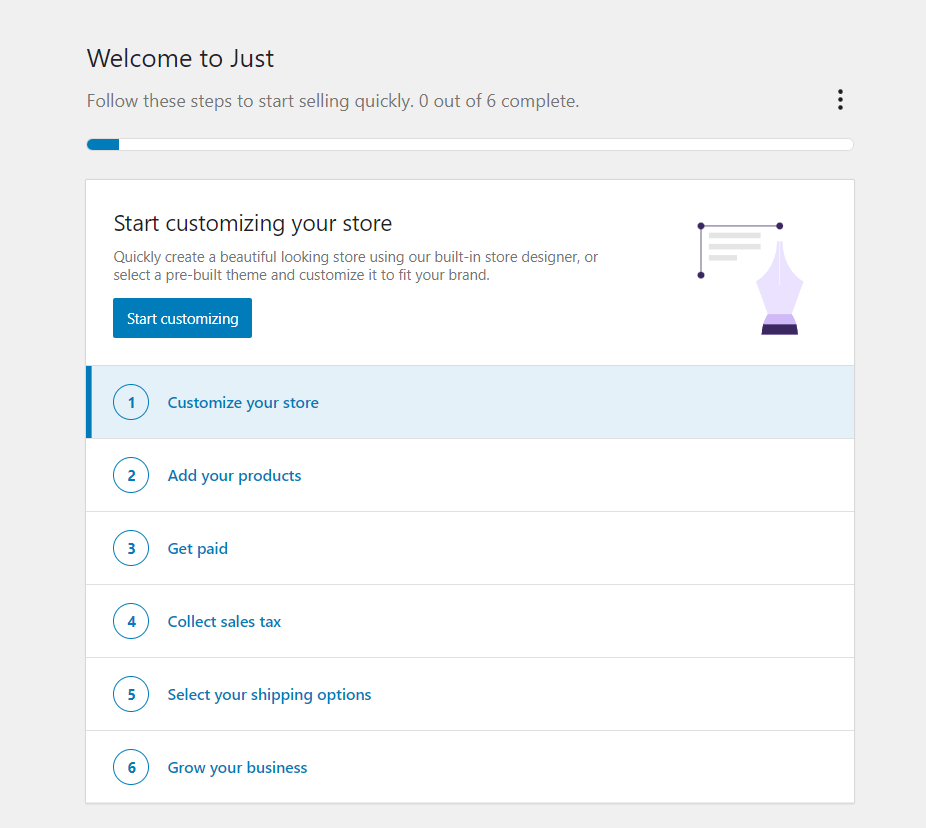
Click “Customize your Store” to start the process.
The first step is to choose a WooCommerce theme for your store. You can review the free themes available and make a choice.
However, I noticed most of the available themes are paid, starting at $40 and going up to $80. However, you can build your theme by clicking the “Start Designing” button.
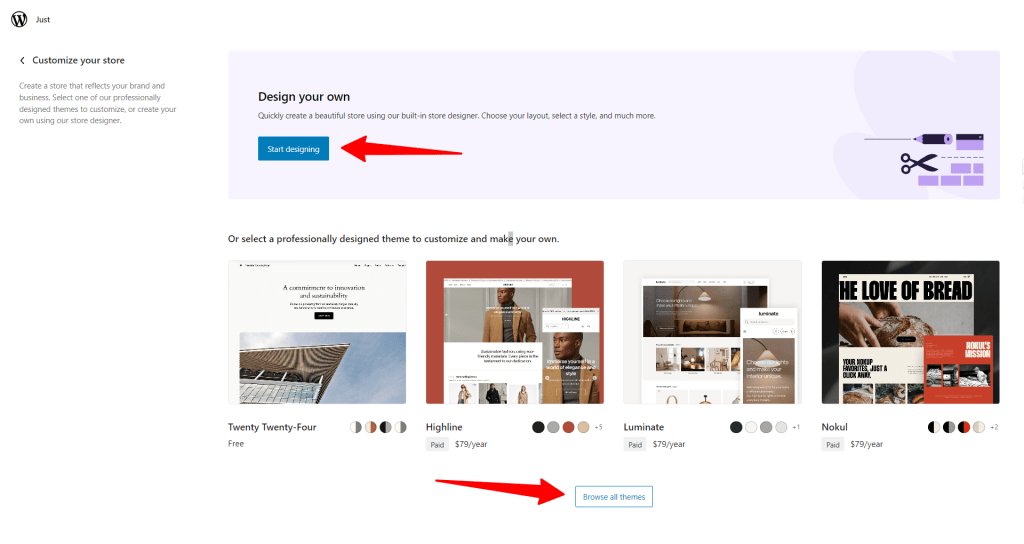
Or, if you prefer the free WooCommerce Storefront theme to get ahead quickly, choose that.
To create our free WooCommerce website in WordPress, I choose the WooCommerce Storefront theme.
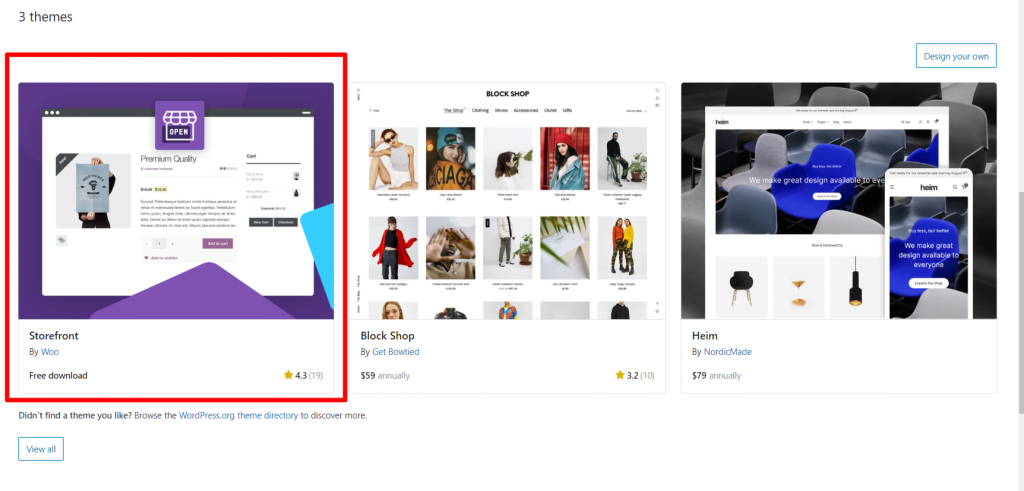
If you select the Storefront theme, you will be taken to the checkout cart page. On this page, you must enter basic account information and purchase the theme for $0. Click the Place Free Order button to continue.
After the order has been finalized, WooCommerce will ask you to pick a store to which you will add your new theme. You must select the correct one if you have multiple stores on your WooCommerce account.
Connect to the right store and follow the required steps. Once you follow through, your theme will be connected to your store, and you will taken back to your WordPress website to add your products.
You can customize your theme here to fit your store design, brand identity, and image. However, for the sake of space, I wouldn’t recommend going deep into customizing your WooCommerce theme.
However, I have several articles in this blog that discuss theme customization in detail.
Setup Payment Option.
WooCommerce offers various payment gateways, which are part of its WooPayment system. These include Credit cards, Visa, America Discovery, Gpay, and Apple Pay.
The WooPayment system integrates Stripe and PayPal, allowing you to process currencies globally.
You need to complete a few more steps to start using WooPayment to process orders on your store.
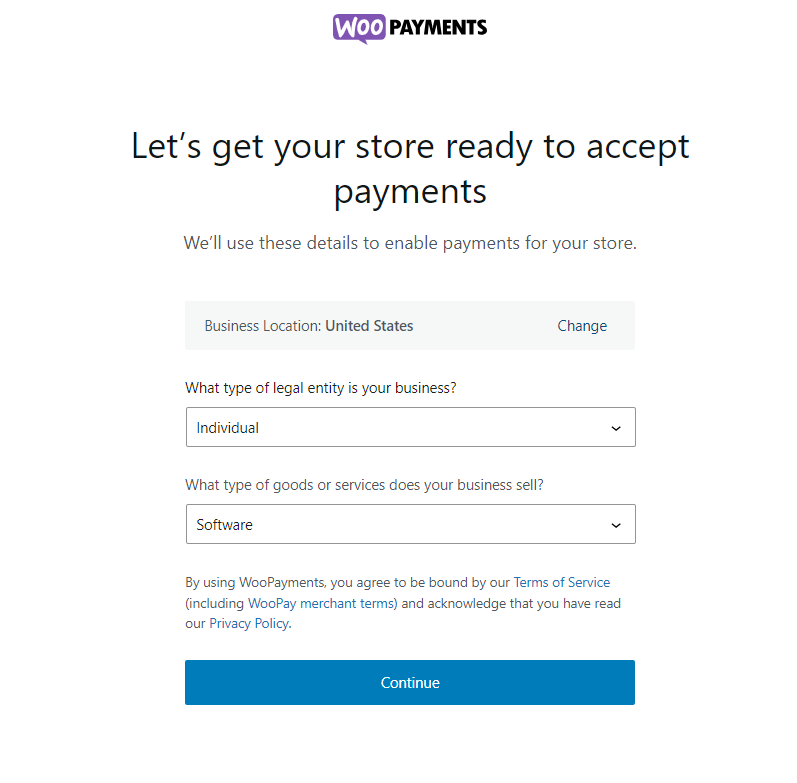
After answering the questions, the final step requires connecting WooPayment to Stripe.
Carefully review the information on this page. You must enter the correct data into each field, such as your name (as it appears on your Government-issued ID), date of birth, and email address.
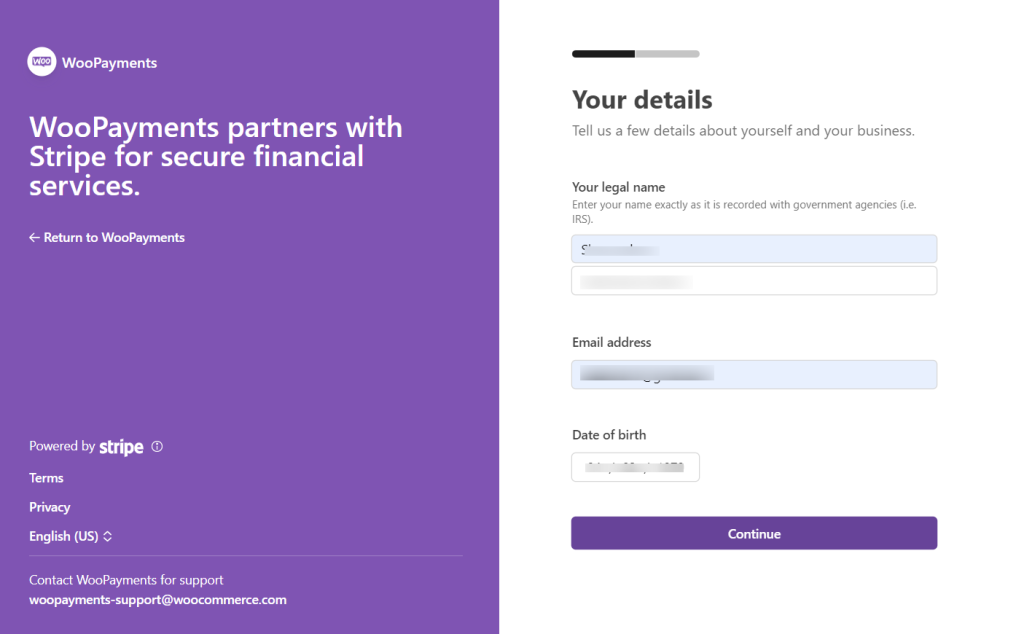
In the next step, go through the entry again one last time and check to see that the data you entered is correct.
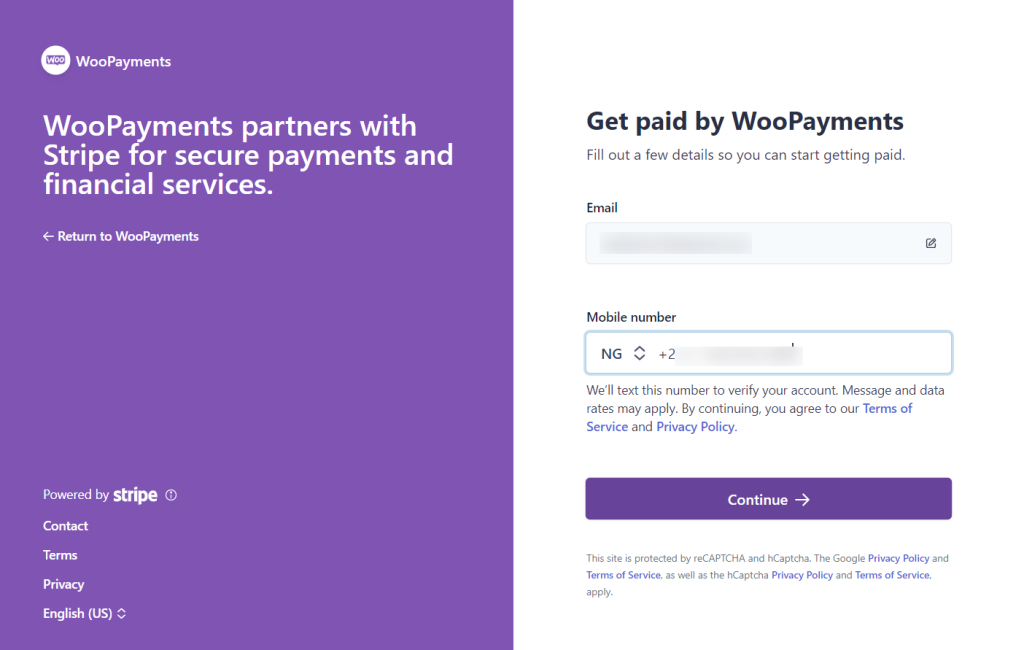
Click next and select your country from the dropdown country list on the next page. Enter your mobile number and click continue for verification. Stripe will send you a six-digit verification code. You must enter this code to verify your identity.
Once you finish these steps, your WooPayment account will start processing, and the page will redirect you to your WordPress dashboard. There, you should see this message.
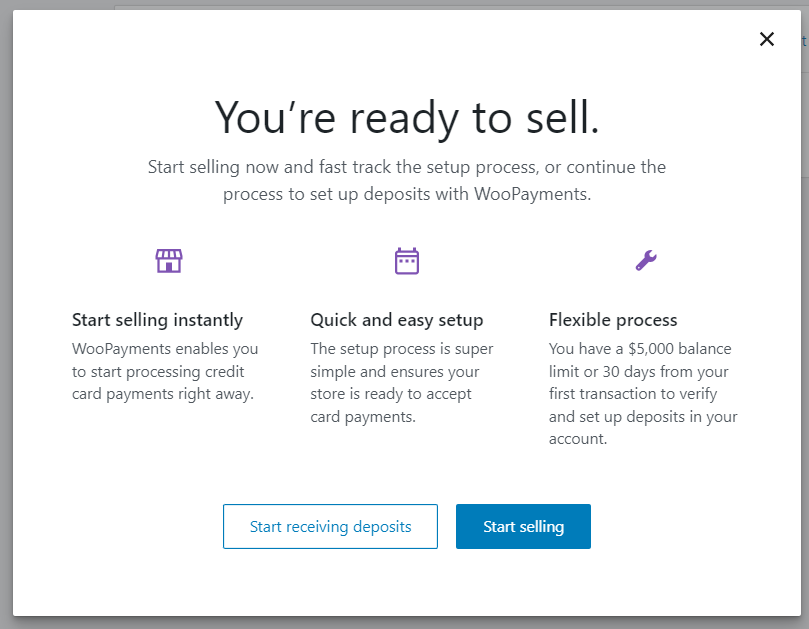
Click “Start Selling” to start adding products to your store.
However, your WooPayment account isn’t ready yet; it’s still under review. You will receive an email notification concerning the status of your account. So, you may not accept payment or receive a deposit to your bank account for now.
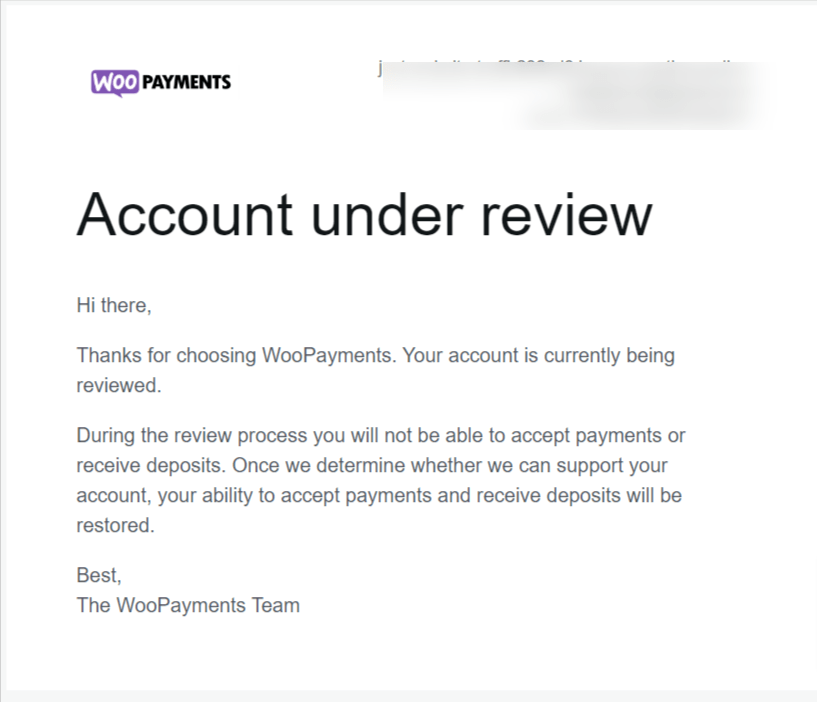
While you await the WooPayments account approval, let’s create WooCommerce websites in WordPress and set up automatic tax collections.
Setup Tax Collection
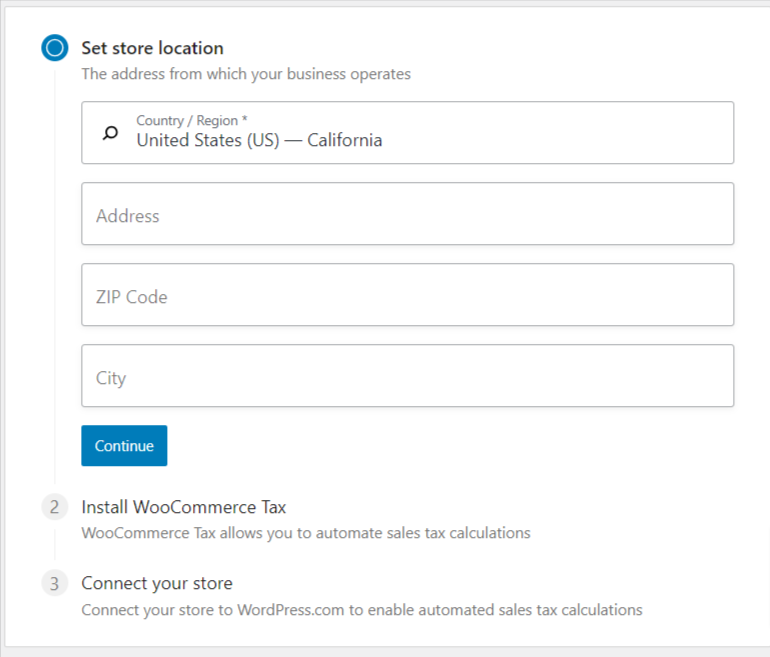
To set up taxes, navigate to Home and click “Collect Sales Tax, “ item number four on the WooCommerce customization list.
Clicking on the link takes you to this page.
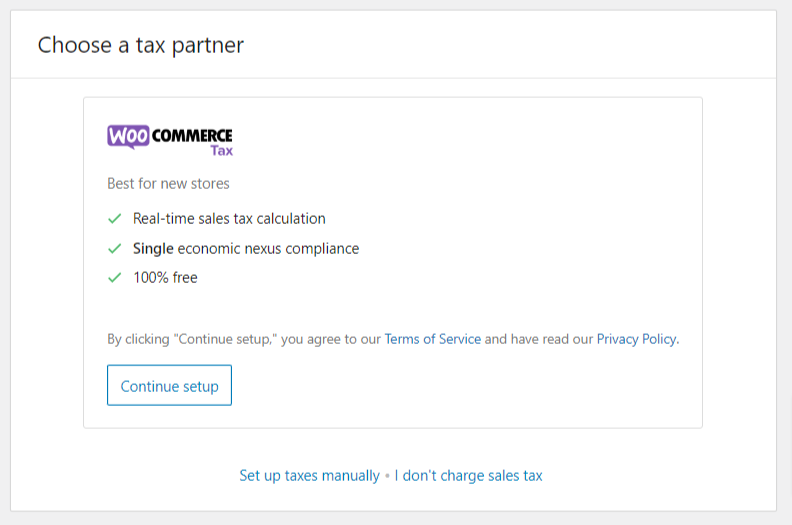
Click Continue setup to proceed.
However, if you don’t want WooCommerce to handle tax calculations automatically, click the “Set up taxes manually” link underneath. And if you don’t need to collect taxes, click the “I don’t charge sales tax” link beside it.
Automating the tax collection process with WooCommerce requires only three steps: enter your business information, install the WooCommerce Tax extension, and connect your store.
Setup Shipping
Like tax collection, you need to set up shipping for WooCommerce to calculate the shipping cost and automatically suggest the best shipping option for products to your customers.
So, click Home and select Shipping from the options.
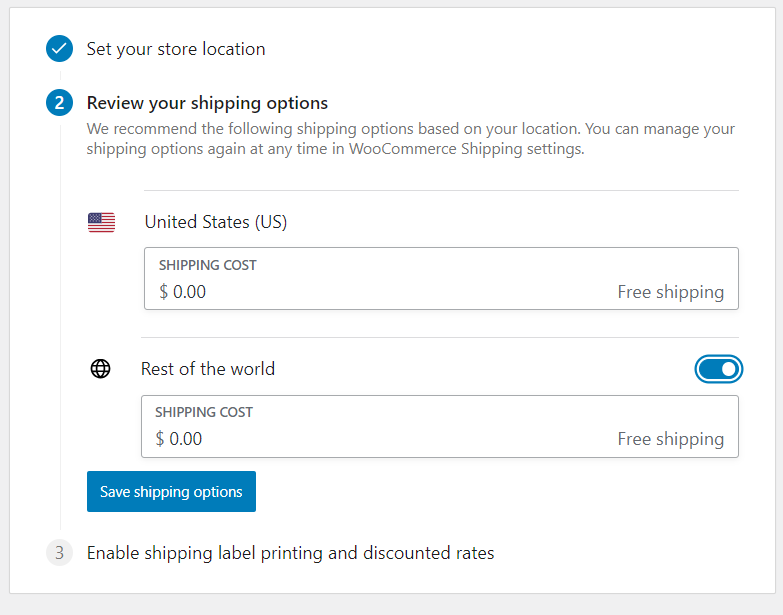
This process also has three steps:
- Select your store location.
- Review shipping option.
- Enabling shipping label printing and discount rate.
The second step is important if you’re shipping to other parts of the world beyond your store location. And what cost will be best for shipping?
After carefully considering various factors, like logistics, handling, middlemen, and so on, enter the desired shipping cost in the fields.
The last step requires an optional installation of the WooCommerce shipping plugin. This saves you time from printing shipping labels like USPS and DHL manually.
One of the benefits of the WooCommerce Shipping plugin is that it hosts the services on its server, relieving the extra load on your store’s hosting.
We have finally come to customize our WooCommerce store via the Setup Wizard. Though there is still one last step to go, that’s optional.
In the last six steps, WooCommere recommends installing a few business growth plugins, such as Google Listing & Ads, Pinterest for WooCommerce, TikTok for WooCommerce, Mailchimp, etc. It is up to you to decide if you need these plugins.
WooCommerce Configuration Settings
WooCommerce provides additional settings for most of what you’ve walked through in the wizard setup stage. You can access these settings by going to WooCommerce>Settings and clicking to open the page.
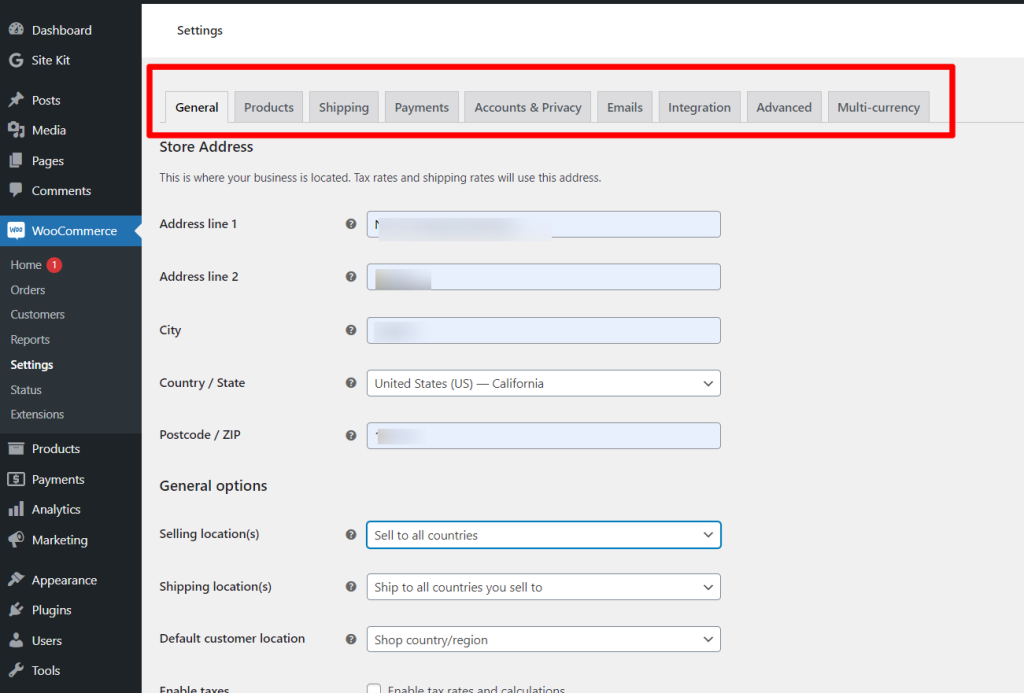
You’ve already completed some of these tabs when going through the WooCommerce wizard, but reviewing each tab is advisable. Some of the tabs need more information from you, like the Products option tab.
If you click the Product tab, you can set which page represents the Shop page. It’s like choosing which page is selected as your WordPress blog homepage.
Other settings are available on this tab and require your attention. Go through the page and enter the necessary info relevant to your store.
Payments Tab
The Payment tab has more information than the initial setup. Here, you can enable/disable a payment option from the store.
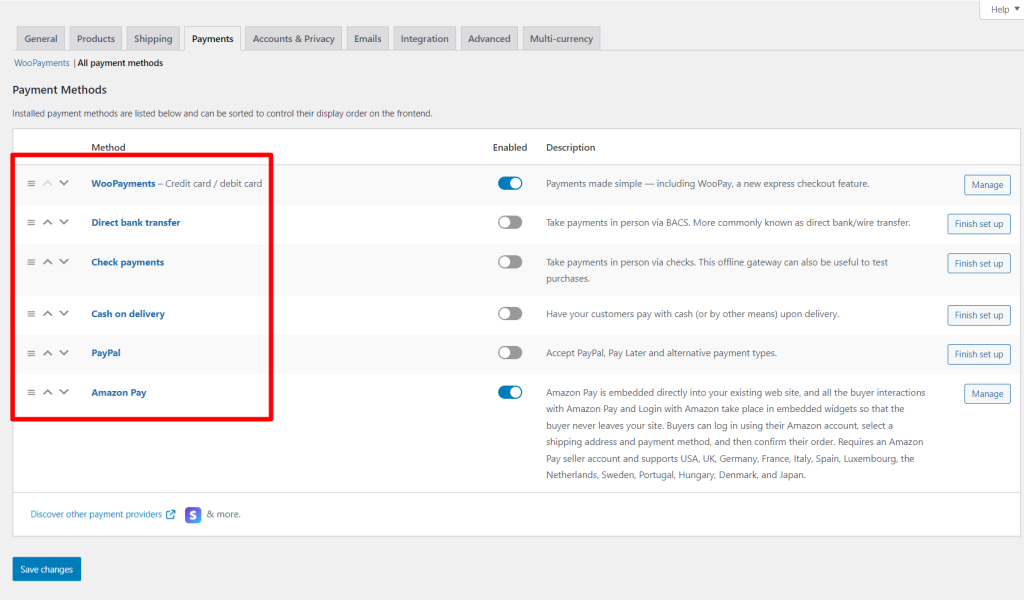
Let’s say you don’t want to use a particular payment method or you want to activate offline payment, such as Check Payments, Cash on Delivery, or Direct Bank Transfer; this is where you access it.
Moreover, in the initial Wizard setup, we did not have access to connect the PayPal account. We can do this by going to the Payment tab and activating the PayPal connection setup.
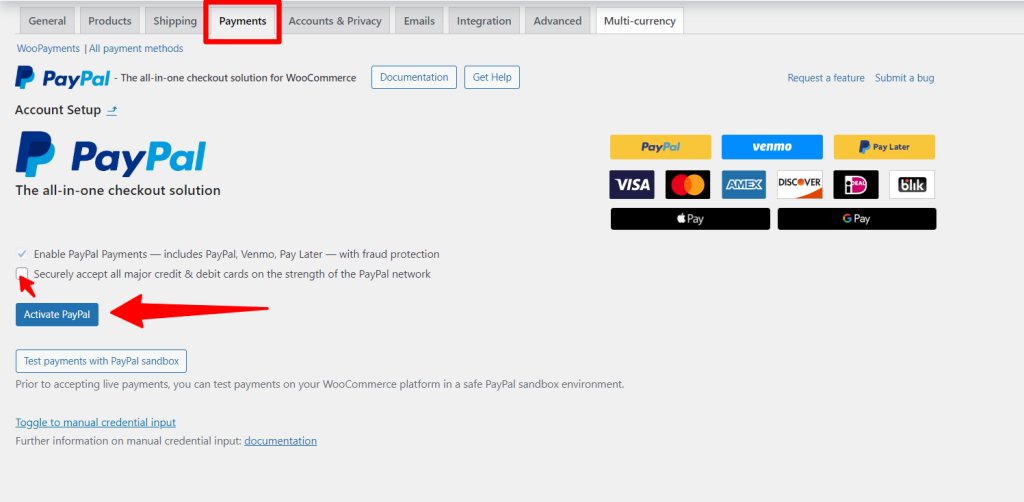
After activation, you need to test the payments by processing orders from your store using the PayPal sandbox environment. This will let you know if there are any issues or errors in payment before you launch the store.
Account & Privacy Tab
Reviewing the Account and Privacy tab’s data is highly recommended.
This tab contains information that affects your store behavior and how it handles user data and protects privacy.
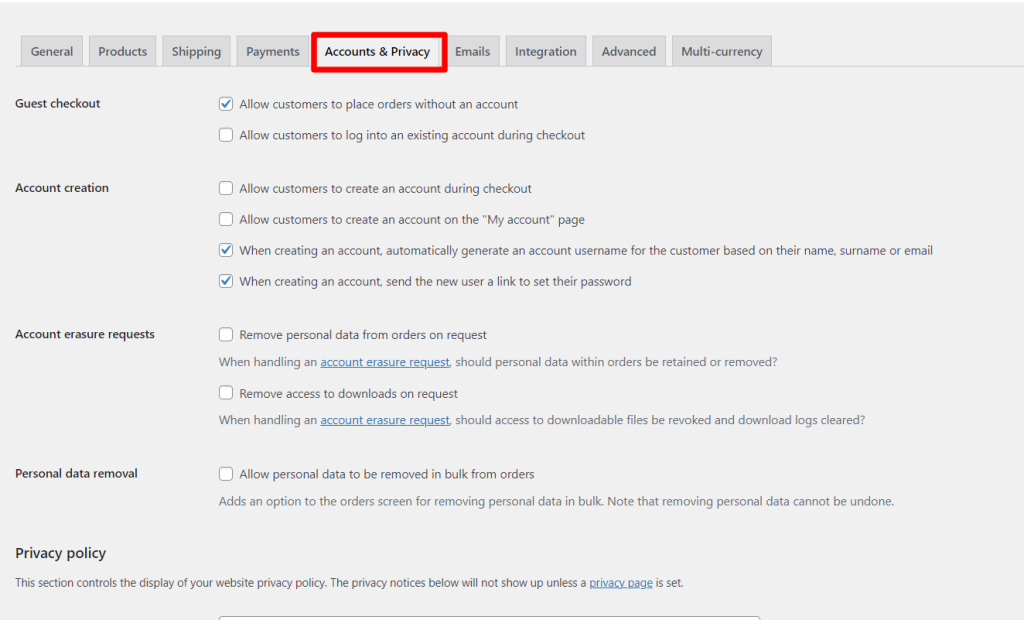
Here are a couple of important information to consider:
- Allow customers to order products without creating an account.
- Allow customers to log in to their accounts during checkout.
- Automatically suggest account usernames based on customer name, surname, and email.
- Give users the option to remove personal data on request.
- Decide how long to retain personal data after it is no longer needed.
- Customize privacy display messages.
- And more.
Multi-Currency Tab
Another tab I highly recommend you check is the Multi-Currency setting.
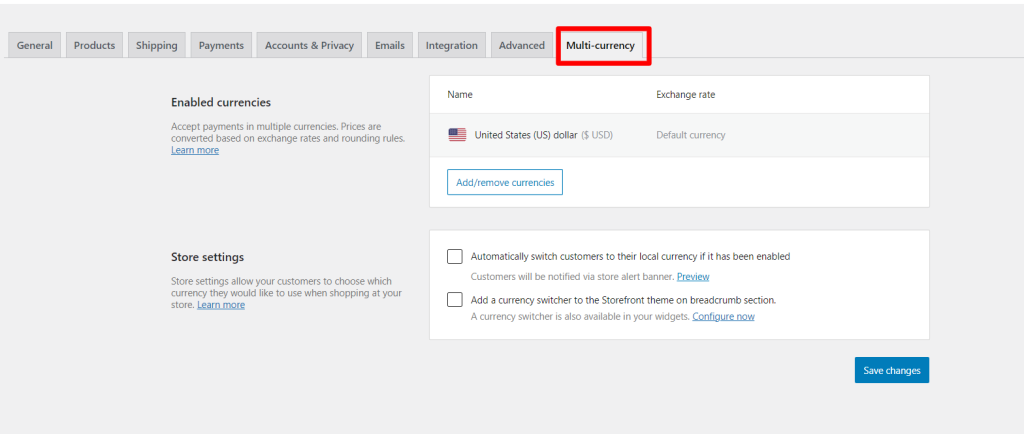
This tab lets you choose whether you want to enable global currency collection. That means your store will process and accept payment in multiple currencies. This is good if you’re selling to a worldwide audience.
Also, on this page, you can enable the option that lets your customer make payments in their local currency. This can be automatic, or you can enable the currency switcher function, allowing customers to switch manually.
In summary, ensure you visit the WooCommerce default settings page and review the settings. Then, make changes according to your store’s needs, business locations, and requirements.
How to Add Products to WooCommerce
Next, in our WooCommerce tutorial, we need to add products to our storefront so that customers can see what we are selling.
Isn’t that why you want to create WooCommerce websites in WordPress?
WooCommerce allows you to add products from a variety of sources and product types to your storefront:
- You can sell physical products that are delivered in person.
- Products with color, size, and other variations.
- Create and sell a group of product collections.
- Sell digital products like eBooks, software, services, etc.
- Link products to external websites where the products are sold (good for affiliate products)
- Import products from another eCommerce platform to your Woo store in a CSV file.
Most of your tasks begin in the editor, and you must add products to build your WooCommerce site. But before we go into the details, let’s unwrap some of the basics you need to know.
- Category – Create and add each product to a relevant category to help users quickly find a group of products in a catalog on the site. Also, categories help you organize related products into a group and make managing them easier in the backend.
- Tags – Create relevant tags that help users find specific products within a group of products more easily. Tags can also help SEO; by adding relevant tags to your products, you help search engines understand the product relevancy better.
- Attributes – In WooCommerce, attributes let you add more filters or information to your products, which helps users discover exactly what they are looking for. For example, you can add color, size, and price attributes to individual products.
Understanding Products Data
WooCommerce has a section within the editor called “Product Data,” which helps save time by simplifying the process of adding relevant product data.
It has preset product data from which to choose. The available settings vary depending on the Product type selected in the dropdown menu.
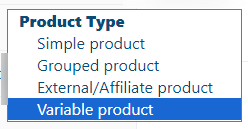
Here is a breakdown of the predefined Product Type in WooCommerce.
- Simple Product—These are products you ship without any options, such as a physical book, jog, mug, etc.
- Grouped Products—Think of a collection of related products, like 12 chairs or plates, which can be purchased individually.
- External/Affiliate Products – This is straightforward to understand. You list the products on your site and direct users with a link to the merchant listing page.
- Variable Products – Products with varying information, like color, size, price, SKU, packaging, shipping, etc.
Don’t let these options confuse you; they are not much different than when creating posts or pages in WordPress. As you become familiar with each option, you will better understand each option’s purpose.
Let’s create a product by selecting the Simple Products type from the dropdown menu.
Navigate to your WordPress dashboard and hover over Products from the menu options. Next, click Add New from the menu to open the WooCommerce classic editor interface.
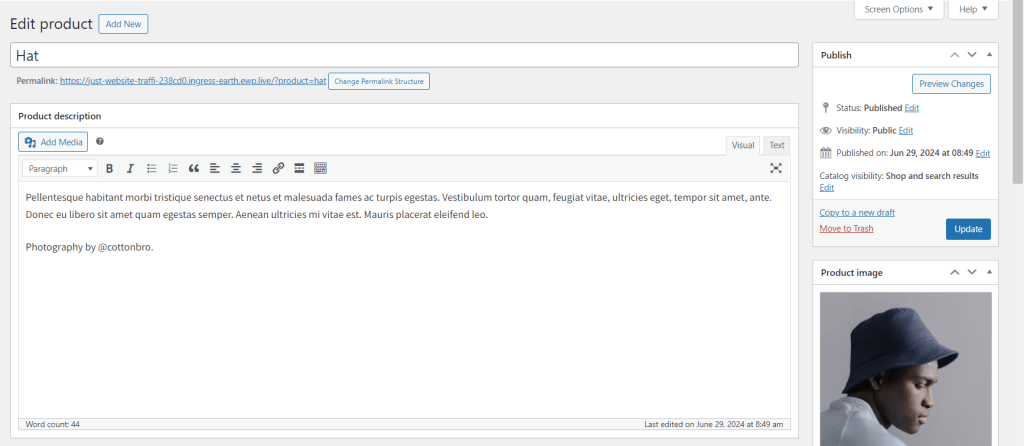
Start by entering your product title, description, category, and tags. Remember to add product images and other relevant items to showcase your product to your customers.
Next, we must configure the data or settings for the Single Products type. Here are the settings:
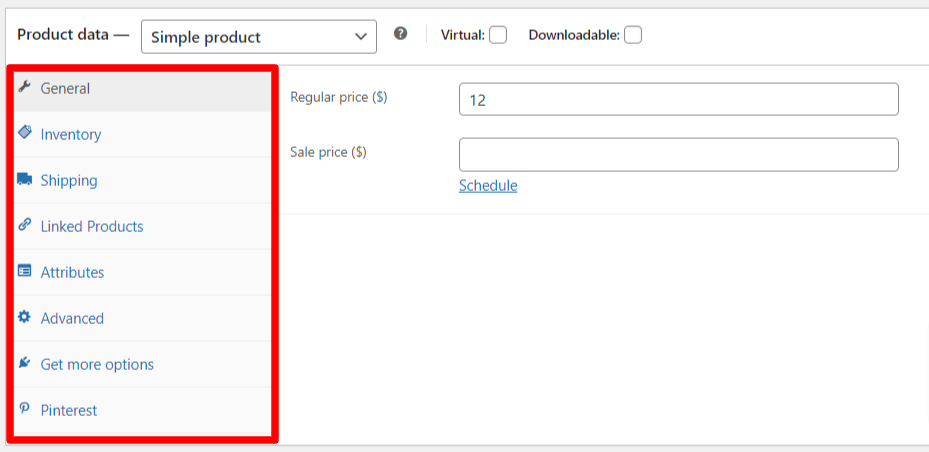
- General—In the corresponding field, you set the product’s price. You can enter both regular and sales prices. Click the schedule link to set a price availability date for the sale price.
- Inventory – This setting contains product data like SKU (Stock Keeping-Unit) identification, stock availability, management, backorders, threshold, and whether products are sold individually.
- Shipping – Set product weight, dimension, and class. In a nutshell, the Shipping section provides product logistic settings.
- Linked Product – Think of this setting as a related post in WordPress. Use it to show related products to customers. It is ideal for upselling and cross-selling similar products.
- Attributes – Use attributes setting to identify specific products and allow customers to search for them within a collection. For example, you can enter color, price, brand name, or size attributes to tag a product from others.
- Advanced – This setting lets you enter customers’ purchase notes, specify menu orders, or choose a custom order menu position for the product.
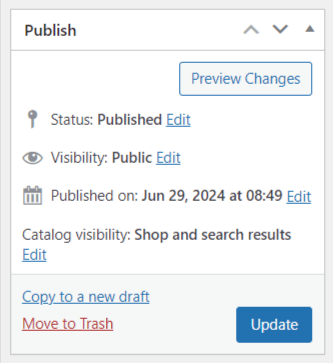
Enter the right information and review everything to ensure you’re not missing something. If you’re satisfied with the info, publish your post.
The publish button is at the right top of the page.
In summary, here are the most important things to consider when adding products to WooCommerce store:
- Create relevant product titles.
- Add product description and include relevant keywords.
- Create and add products to relevant categories and tags.
- Add product attributes where relevant.
- Create a product gallery for relevant products.
Launching Your Store
Before you launch your store, test it thoroughly. Place test orders to ensure the entire checkout process works smoothly.
Navigate the entire site; check inner pages, collection, and catalog, and ensure everything works as expected.
Next, you need to set up Google Analytics to track your store performance. You can set up eCommerce conversion rate tracking in Google Analytics to track conversions that matter to your business.
Here’s a detailed guide if you need help setting up Google Analytics and e-commerce conversion.
Additional WooCommerce Settings and Considerations
WooCommerce Permalink
WooCommerce offers several SEO-friendly store URLs. Apart from the default WordPress permalink structure, you have several custom variables and product-based URLs to customize your WooCommerce permalink.
You can use different taxonomies like product categories and tags. Your WooCommerce URLs could include a Product default base, something like this:
https://mystorename.com/product-category/shirt/You can do this for tags and customize the URL to not include the product default base. There are lots of options, including:
- Shop base.
- Shop based on category.
- Custom base.
- Products Attribute Base.
- Product Tag Base.
- Product Category Base.
Go to WordPress, hover over Settings, and click “Permalink” to open the WooCommerce permalink setting page. Review the options and choose what best suits your online shop.
WooCommerce Image Optimization
When you add product images, use descriptive file names and alt text to improve image search.
Since you’ll be uploading a lot of product images, optimizing them for optimal performance is critical so your store does not experience slow loading time.
Use image optimization plugins like Imagify to compress them on the fly and convert them to WebP or the AVIF format. Imagify will also compress your images to reduce their file sizes and make them load faster.
Using the Imagify WordPress plugin will optimize and compress images upon uploading to the WordPress image library.
Updates Regularly
You should regularly update your store’s plugins, theme, WooCommerce, and WordPress. This helps with compatibility and stable site performance.
Many web hosts automatically update WordPress core, themes, and plugins. This allows you to focus more on running your business instead of spending time on server and website management.
WP Engine and Cloudways are two hosts that offer feature-rich hosting services, including automated daily backup, performance optimization tools, eCommerce-focused hosting, 99.99% server uptime guarantees, airtight security features, malware scanners, and more.
Offer Customer Supports
Customer support is one of the core services and requirements for a successful eCommerce business.
You must provide excellent support services that are responsive to customers’ inquiries and offer helpful assistance.
The more helpful and responsive support you can offer, the more your customers will trust and recommend your business to others.
At the barest minimum, you should provide email, social media, and online support channels.
Your customers should be able to reach you via several mediums, not just email ticketing.
Store Refund Policy
Consider setting up a refund policy. Make it clear on your website what items qualify for a refund, how you handle return products, and the expected refund period.
It shouldn’t be difficult to find this information on your storefront.
The link to the refund policy page should be visible on every page of your store. Ideally, it should be added to the website footer or main navigation menus.
Promotes Your Store
Use paid advertising to promote your store while you work on improving SEO. Since this is an eCommerce website, it makes sense to devote a significant budget to advertising.
Some paid advertising agencies or channels to consider are Google Ads, Microsoft Ads, Facebook advertising, Pinterest ads, TikTok ads, etc.
You should experiment with a minimal budget and test different marketing campaigns, keyword targeting, A/B testing, etc.
Based on your result, devote more budgets to campaigns that have better ROI.
Conclusion.
WooCommerce is a great option for selling online, whether physical products, digital downloads, services, or whatever. If people can order it online, you can sell it through WooCommerce and WordPress.
There are some key takeaways to emphasize in this WooCommerce tutorial, and they are:
First, choose a reliable and fast web host. Next, make sure you’re using a lightweight and responsive WooCommerce theme. Then, get used to the WooCommerce product settings.
Creating WooCommerce websites in WordPress is not difficult if you follow the steps described in this article. But you need more time to understand key settings like Payment, shipping, theme customization, privacy control, and more.
This is why starting is the most important aspect: as you get more familiar with and work consistently on your store, you’ll discover that most technical aspects are not all that technical.


