The WordPress footer is more powerful than you might think. You can use it to display essential information that helps users understand your core business, interact with your brand, and even learn more about who is behind the site.
If utilized to its fullest, you can edit the WordPress Footer to increase brand awareness, direct users to legal and contact us pages, improve user experience, and internal link to enhance SEO.
In today’s WordPress tutorial, I will show you how to customize the WordPress footer to include any content or information you want.
From a simple drag-and-drop option to more advanced methods like hooks to create personalized Footer content, you will learn more about editing WordPress footers in this guide.
What is WordPress Footer?
A WordPress Footer is the bottom section of a WordPress site that usually appears on every page. It usually contains information like a Copyright notice, links to WordPress pages, branding elements, social media icons, newsletter forms, etc.
Beyond these, you can customize your footer to include any content you want. There are lots of ways to do that. Some notable WordPress blogs have edited their footer to improve user experience, engagement, SEO, and branding.
Hostinger website Footer.
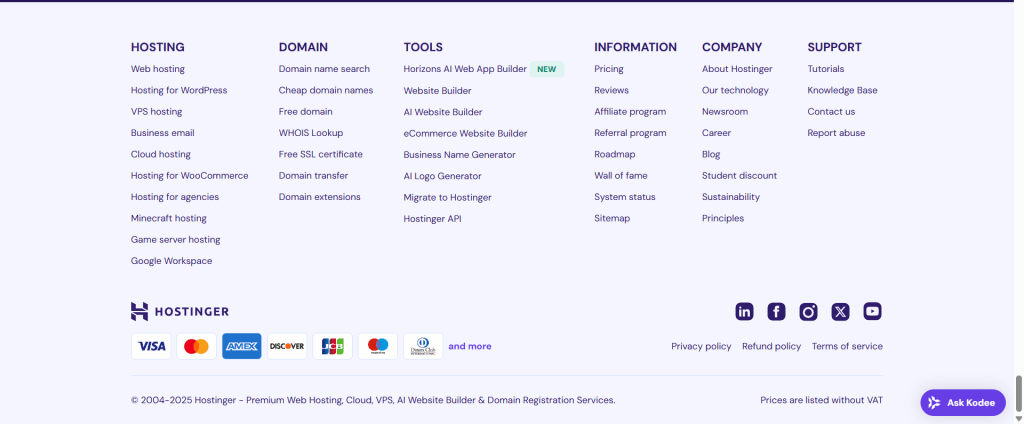
Do you see how Hostinger uses its website footer to include more information and links to product pages, tools, support, and company information?
This is a classic example of how you can turn your site footer into a powerful tool that directs users to prominent pages on your website. The good part is that this footer appears sitewide, so no matter where you are on the website, you’re one click away from these important pages.
Hostinger displays acceptable payment methods in the footer as a business that processes payments. This helps potential customers know how to make payments on the site.
Neil Patel’s Website Footer.

Neil Patel keeps it simple, short, well-organized, and uncluttered. It is more focused on directing users to its training course, tools, pricing page, contact us page, and sign-up page.
The social media icons in the footer link to his profile pages. Interested users can click these links to follow Neil Patel on social media. This is a good way to increase your follower count. Though not as effective as other strategies, it’s never a bad idea.
Now, let’s walk through how to edit the footer in a WordPress blog.
Edit Footer in WordPress Customizer
The WordPress customizer is the most common way to edit the footer of most WordPress themes. Most themes integrate with the customizer, allowing you to customize and edit every template section, including the footer.
If your theme has a Footer builder, you can edit it in the customizer. I use the Astra theme, which has a three-layer footer and header builder. Let’s use that for this example.
Other themes, like Kadence, GeneratePress, Neve, and many more, have similar processes.
Go to Astra or your theme in the WordPress dashboard and locate the Customize option. In Astra, the customize menu is located under Astra>Customize.
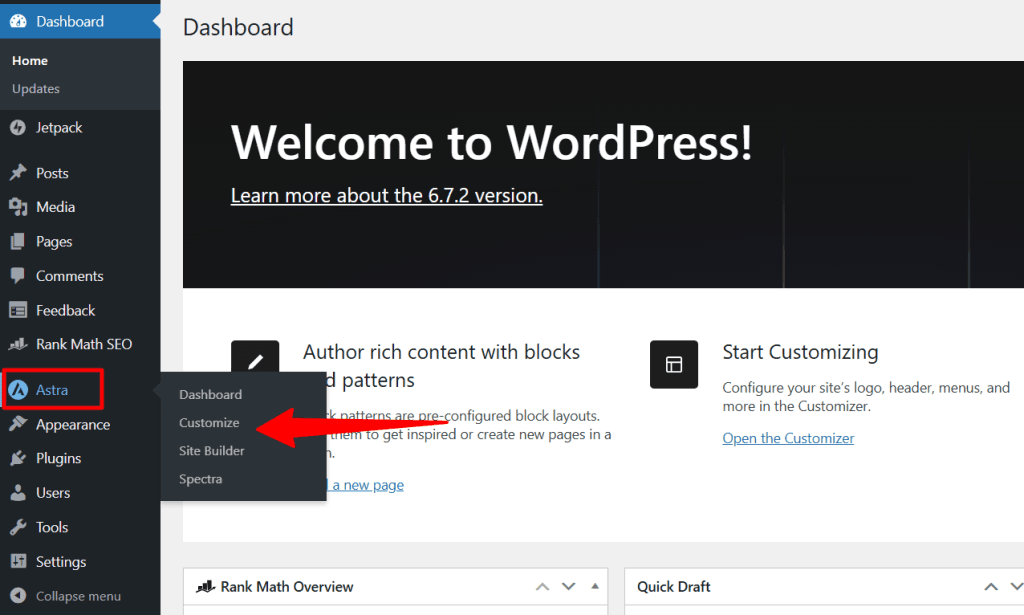
In your own theme, it might be under Appearance>Customize. Once you locate the Customize option, click it to open the Customizer screen.
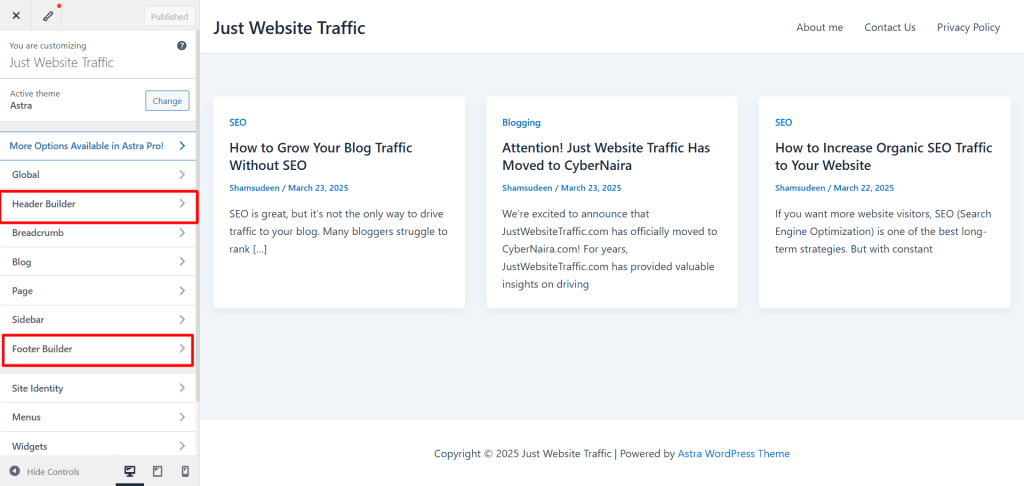
The image above shows the Astra header and footer builder option. This simple yet powerful drag-and-drop editor allows you to add WordPress widgets to any part or column in the footer or header.
Clicking the Footer Builder menu opens the three layers footer section.
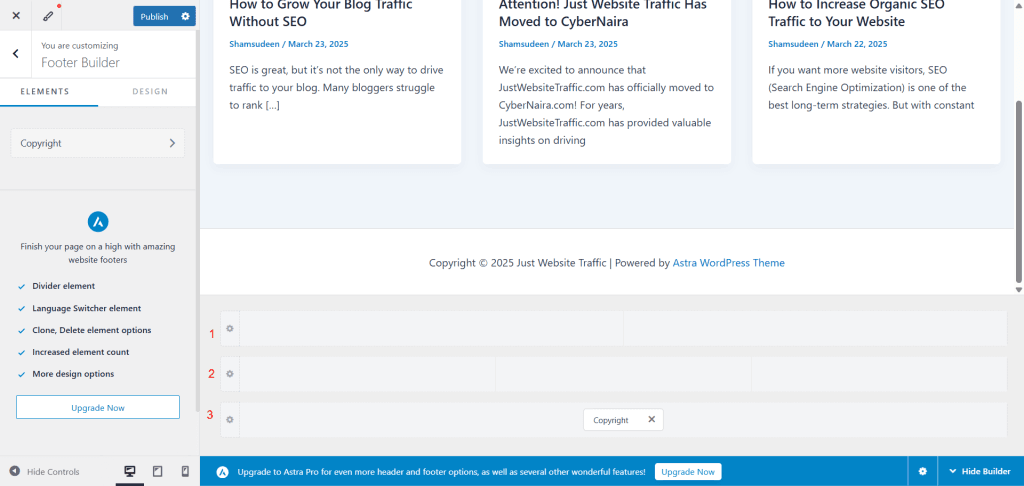
This three-layer Footer builder lets you edit or customize it to your needs.
Click each layer’s small setting gear icon to open the General and Design tabs. Here, you can customize that particular Footer section with controls such as Column, layouts, alignments, padding, margin, border, and color.
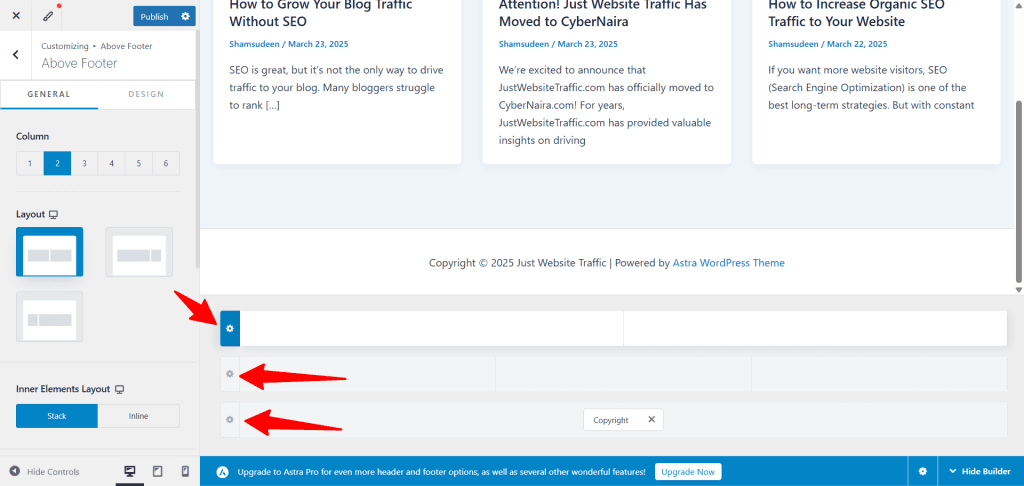
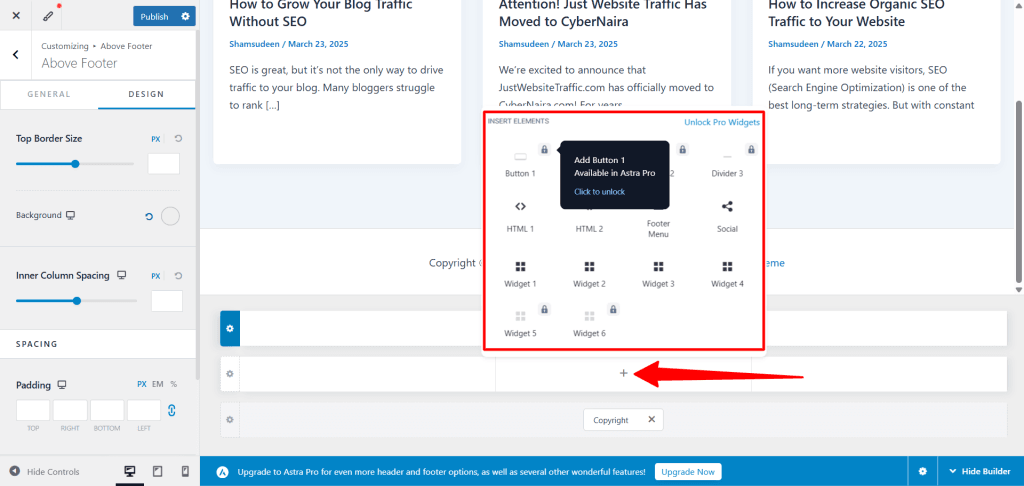
To add a widget to your Footer, hover over any Footer column to reveal the + sign and select a widget from the available options.
Now, you can add content to a widget in a column by adding a WordPress block element and editing its content as needed.
Click the small gear setting icon to add a block to a widget. This will open the + (Block inserter icon) sign in the left-side panel for the block editor. Click this to open the block search bar.
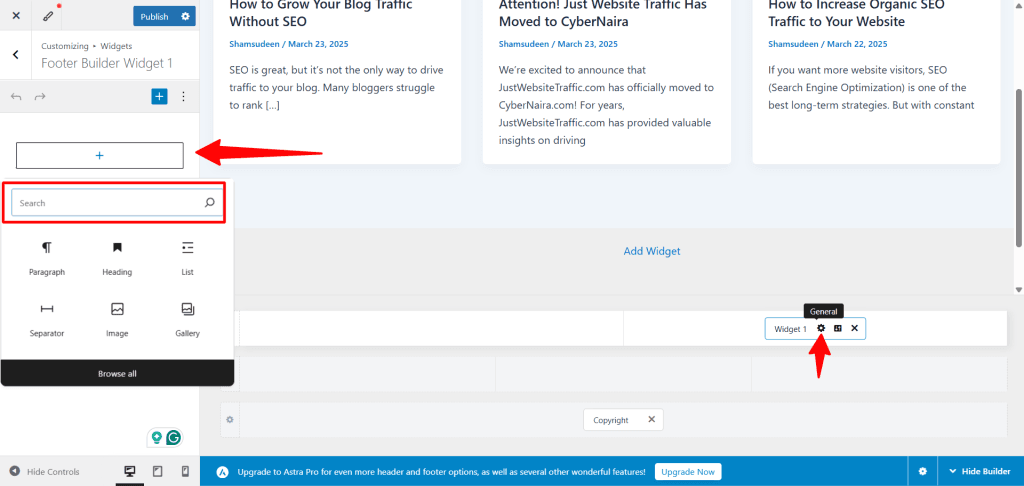
From here, you add your block content to the widget. Next, you need to customize the Widget. To do this, click the “Design” icon on the Footer widget.
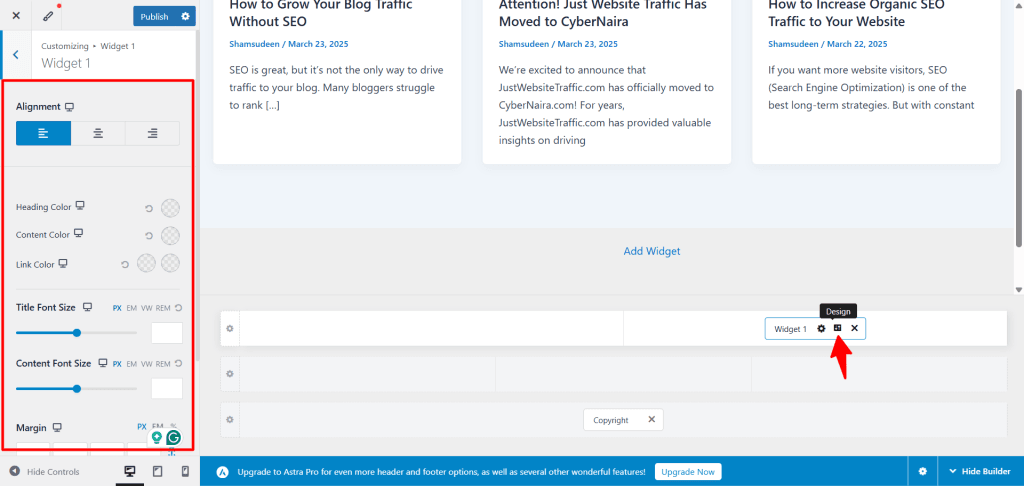
Once you click the “Design” setting icon, the specific customization options for that particular widget are opened. Use the controls to customize it to fit your site branding and message.
This setting lets you customize elements such as the heading, color, font title, font size, margin, and border.
Next, each block you add to a widget has its own settings, which allow you to customize its content, just like in the Gutenberg editor.
Click anywhere on the block content to open the settings for any block you added to the footer widget. Next, click the three dots in the toolbar and click “Show more settings”.
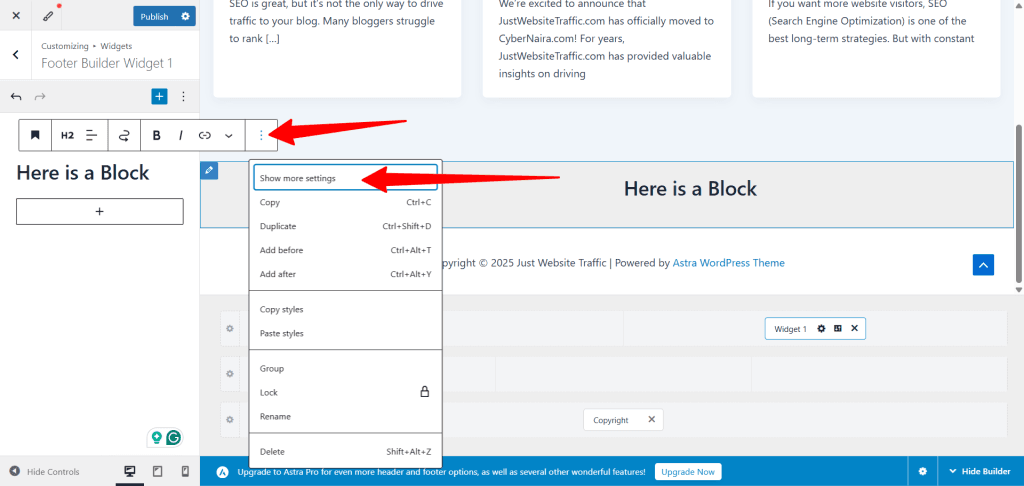
This action opens the corresponding block content settings. The available settings depend on the block you added. The main thing here is that you can customize the block as you would in the Gutenberg editor.
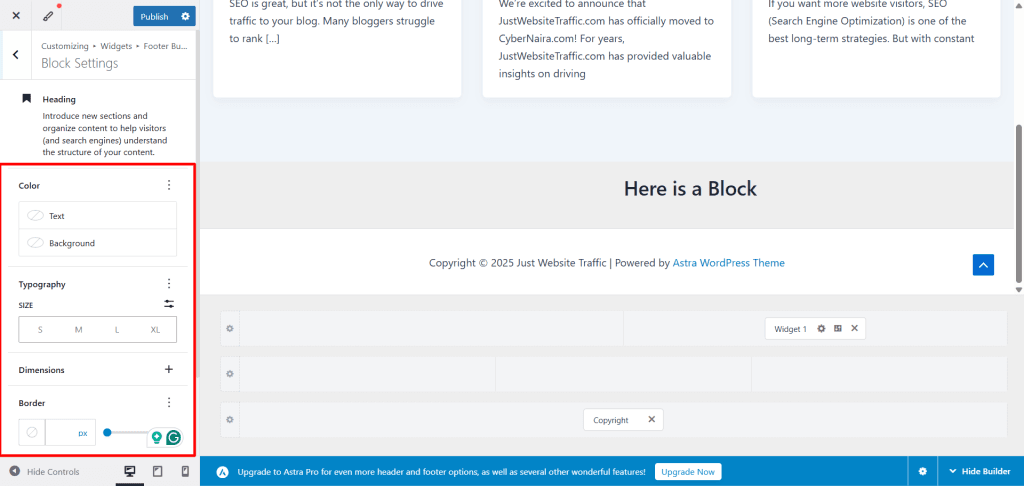
Once you’ve customized the block content, click publish to make the changes live. Another cool feature is that as you add content to your Footer, the customizer’s live preview displays it in real time, so you can see the changes before clicking the publish button.
Note:
Astra Pro offers more control and options for editing the Footer in WordPress. The Pro add-on lets you add language switcher elements, dividers, increased element counts, delete, clone, etc. to the Footer. In this post, I show you how to add custom design or content to the Astra theme footer.
Add Widget to Footer Section
Another way to edit the Footer in WordPress is through the Widget page. Many classic WordPress themes allow you to add widgets directly to the Footer, Primary Sidebar, Header, etc.
You can add a Widget to the Footer by going to Appearance>Widget in your WordPress dashboard and clicking Widget from the menus.
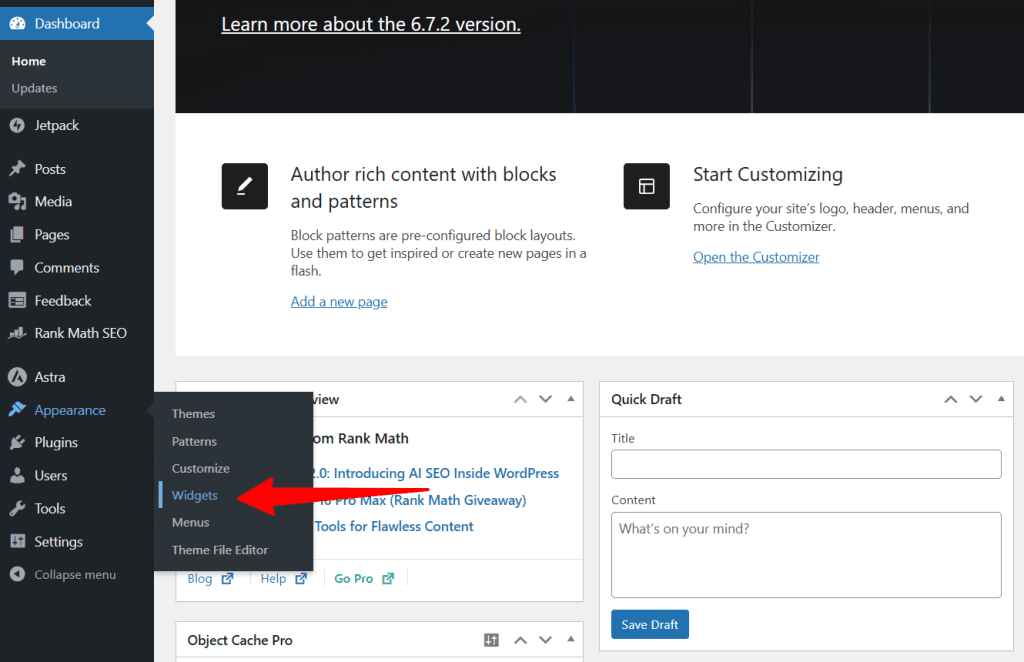
If you didn’t see Widget here, it’s likely because you’re using a Full Site Editing theme or another type of theme.
On the Widget page, review how many areas your theme allows you to drag and drop widgets. Each theme has different widget areas where you can add block content.
Let’s use the Astra theme again for our tutorial on editing the WordPress footer by adding widgets.
Once you’re on the Widget screen, you’ll likely see multiple Footer Widget areas depending on your theme. There is no specific number of Footer areas; it all depends on your theme.
As shown below, this theme has two widget-ready areas in the Footer.
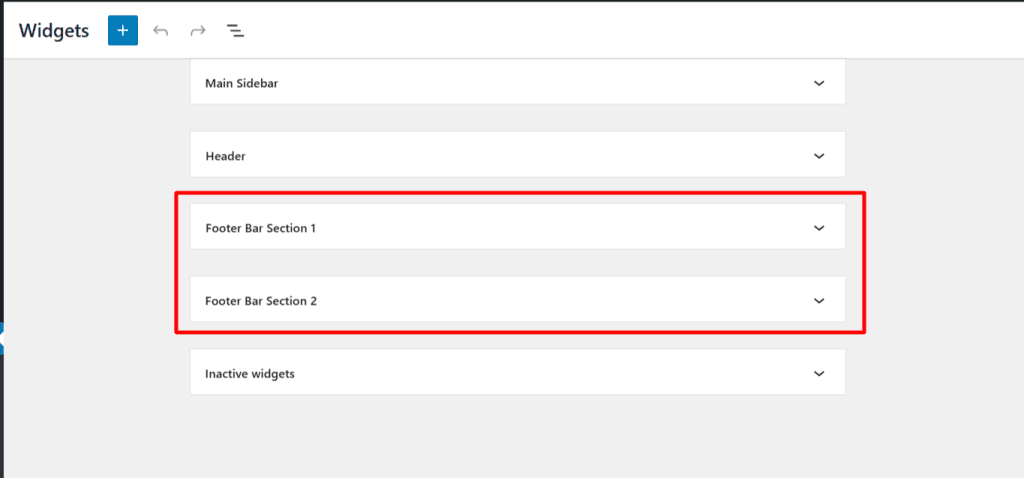
Click the dropdown icon to expand a Widget and click the + (plus) block inserter icon. Next, search for your block and add it to the widget area.
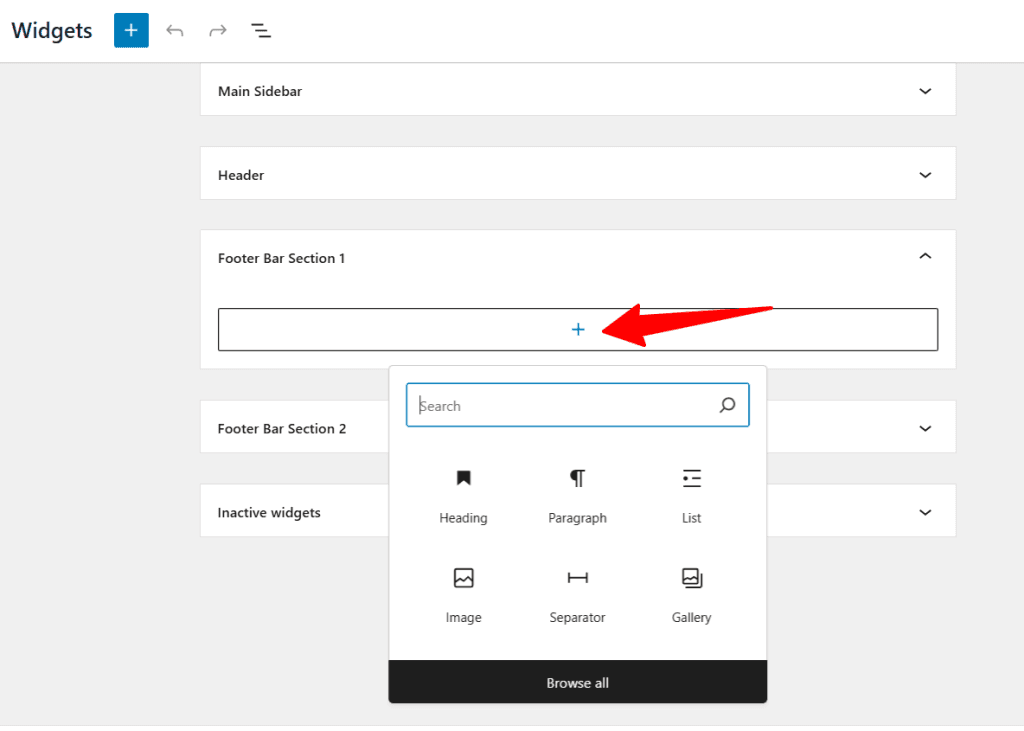
Add your block and customize it. To add customization to a block of content, click the particular block to make it active and open the customization panel.
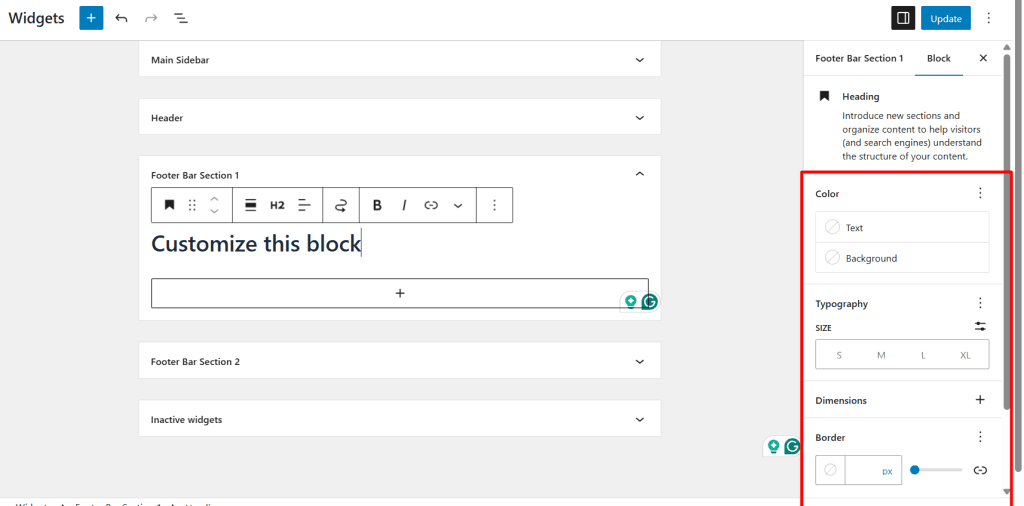
Remember, the customization you see here depends on the block content. Once you’re done, click ‘Save’ or ‘Update’ at the top right corner of the page to make your theme changes live.
You can add any block in a WordPress widget, including a social media profile, newsletter, shortcode, HTML block, image block, paragraph block, video block, etc.
Customize Footer With Astra Pro
Now, let’s say you want to create a custom Footer for specific posts or pages on your site. Astra Pro enables you to do that with its Site Builder feature. This is not editing per se; it is more like creating a personalized or custom Footer that differs from the entire site Footer.
Note that this is a premium feature; to achieve this level of customization, you’ll need the Astra Pro add-on plugin.
If you don’t have the Astra Pro theme add-on license, get it here.
After activating the add-on plugin, go to Astra>Site builder and click Footer layout.
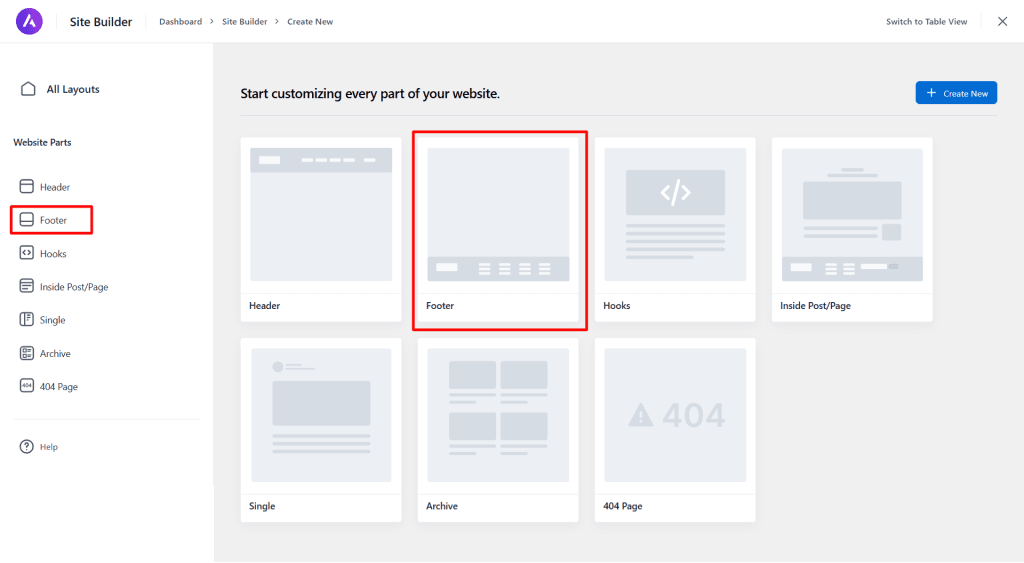
This will open the WordPress Gutenberg editor.
Now, depending on your design skills and what you want to do. What type of customization would you like to apply to the Footer?
You can add codes, images, columns, rows, block elements, or use page builders to design your Footer and apply the design to individual pages, posts, the site, archives, special pages, categories, tags, and more.
What you can achieve here is unlimited. After designing your Footer, click the Site Builder icon on the editor’s top bar. This icon reveals the settings, where you can configure display and user conditioning, device visibility, sticky, and time conditions.
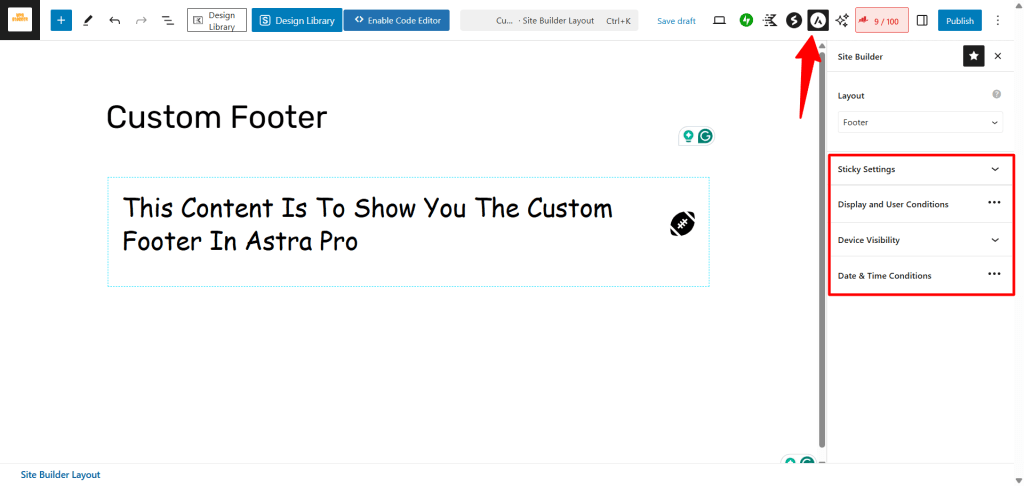
- The sticky setting lets you choose to make the Footer stick to the page on scroll.
- Display and User Conditions let you select which page/post/taxonomy your custom Footer displays on. Also, you can exclude specific pages and choose a user role for your custom Footer display.
- Device Visibility allows you to control custom Footer visibility.
- Date and Time Conditions let you set the start and end dates for your custom Footer. This is useful if you’re running a time-sensitive campaign.
Astra Site Builder is a powerful tool that enables you to create custom designs for any page, add custom content to posts or pages, and customize default 404 pages, blog pages, archive pages, and more. It is also helpful for adding scripts to any template section, such as the wp_head, body tag, footer tag, sidebar, etc.
Edit Footer in Full Site Editing Theme
The Full Site Editing (FSE) theme takes a different approach when editing the Footer section. Since this theme doesn’t have the traditional WordPress customizer or Footer Builder, it utilizes the Gutenberg editor for editing any template section.
To learn if your WordPress theme supports Full Site Editor, hover over Appearance and check if you see “Editor” in the menu. The default WordPress Twenty Twenty theme is Full Site Editor.
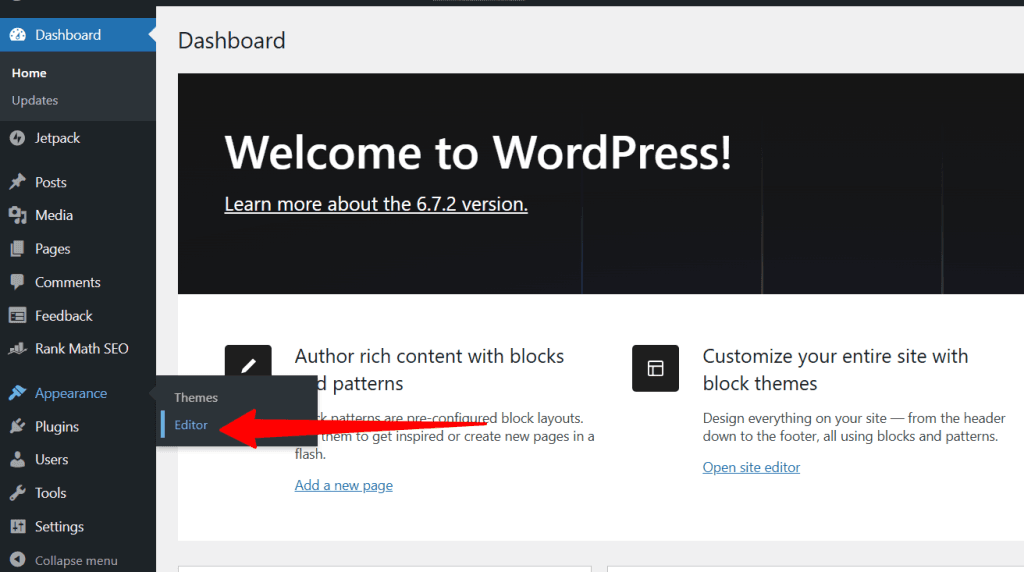
To edit a Full Site Editing theme’s Footer, click Editor under Appearance. This opens the Site Editor screen. On the Site Editor screen, scroll down the page to the bottom section and click anywhere on the Footer.
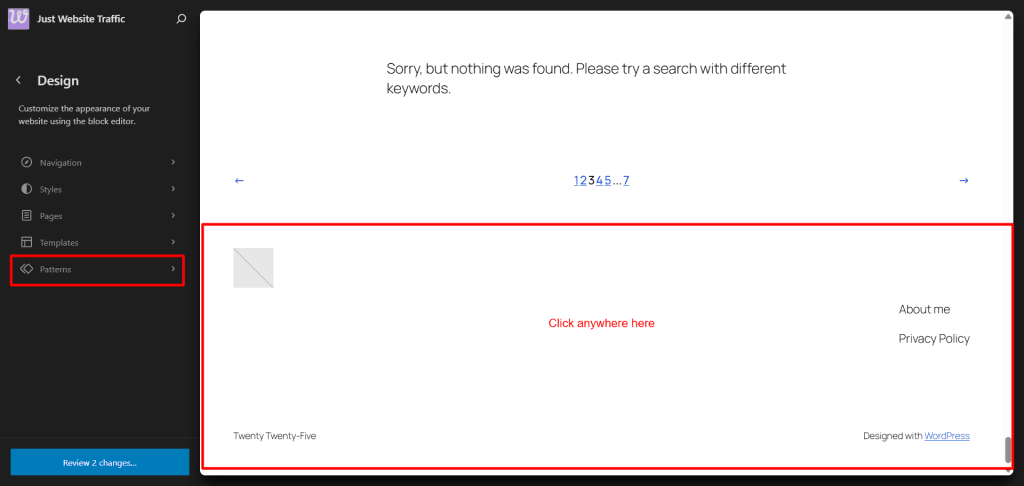
Alternatively, click Pattern > Footer and click the three dots to display the option labeled “Edit.” Click it to open the Footer template section instead of the home page. This allows you to focus only on the Footer section.
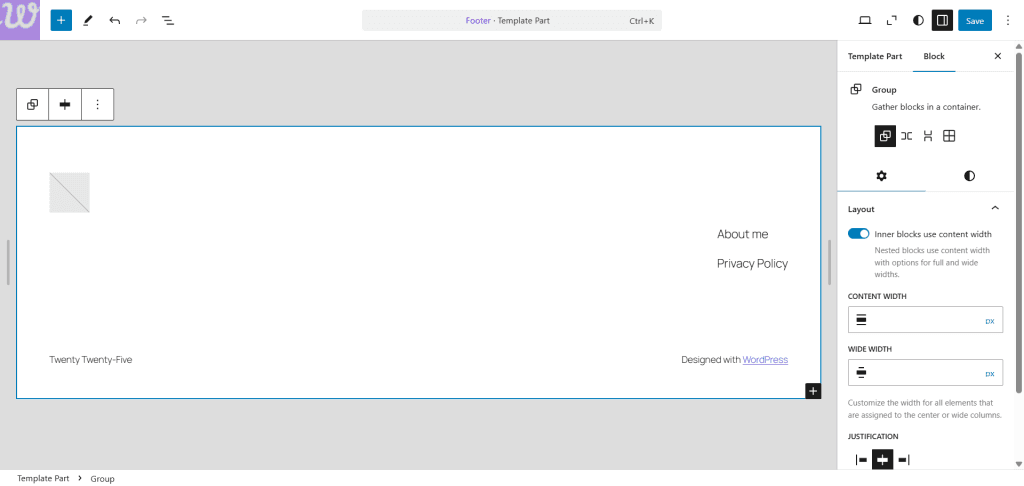
You can add new blocks, edit existing ones, and delete, rearrange, and customize the entire section to fit your branding. Use the settings on the right-side panel to customize active block elements and the + sign to add new blocks.
Click save when you’re done editing your Footer.
Conclusion
I hope you’ve found a suitable way to edit the Footer in your WordPress theme from reading this post. Whether you are a beginner, intermediate, or advanced WordPress user, there’s something in this article for everyone.
The easiest method is through the customizer. As I mentioned earlier, most classic WordPress themes provide this option to design your blog pages and preview changes in real-time.
However, consider buying Astra Pro, which offers unparalleled customization for custom Footers. You can add custom design or content to any section of your site.
Let me know which option in this article works best for you.


