One of the best aspects of using WordPress is its flexibility. You don’t need to be a designer or know how to code to make your website look exactly how you want.
Whether you want to change your site colors, layout, or even the entire homepage design, WordPress gives you built-in tools to do it all with just a few clicks.
If you’re just getting started, it’s easy to feel overwhelmed by all the settings and menus. But once you know where to look, customizing your site becomes fun, almost like decorating your home.
You can experiment with styles, test different layouts, and instantly see how everything looks before saving your changes.
If you read this post till the end, I will share practical, simple ways to customize your WordPress site without touching a single line of code. You’ll know how to customize your site’s colors, fonts, menus, and pages, all from your WordPress admin area.
Use the WordPress Customizer
The WordPress Customizer is your primary control center for customizing the appearance of your website. It’s built right into WordPress, and the best part is – you can preview your changes live before publishing them.
To open it, (regardless of your theme) log in to your WordPress dashboard and go to: Appearance → Customize
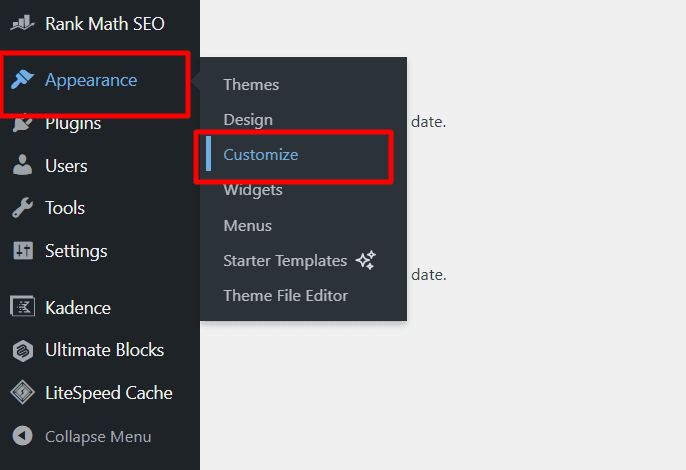
This will launch a panel on the left side of your screen, along with a live preview of your site on the right. Every option you click opens a new menu on the panel and updates the preview instantly, allowing you to experiment freely without breaking anything.
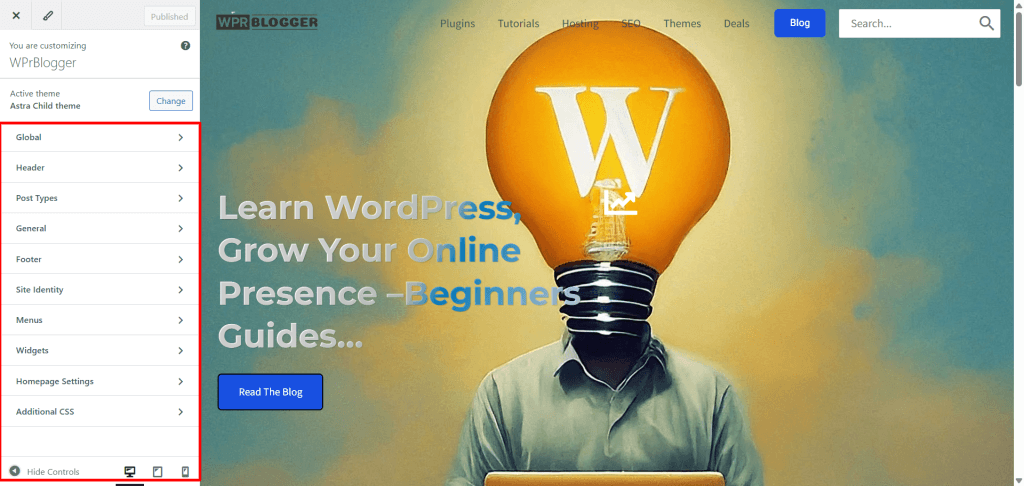
Here’s what you can do in the Customizer:
- Update your site title, tagline, and logo: Navigate to Site Identity to upload your logo, enter a site title, and customize the tagline. This is the first thing visitors notice, so keep it simple and recognizable.
- Adjust colors and Site backgrounds: Most themes let you choose your own color palette and background image or color. You can play with different combinations until you find one that fits your style.
- Edit fonts: Some themes include typography options that allow you to adjust font size, weight, and spacing. Stick with readable fonts and avoid using too many at once.
- Manage menus and widgets: You can add navigation menus and sidebar widgets directly from the Customizer, without needing to switch screens.
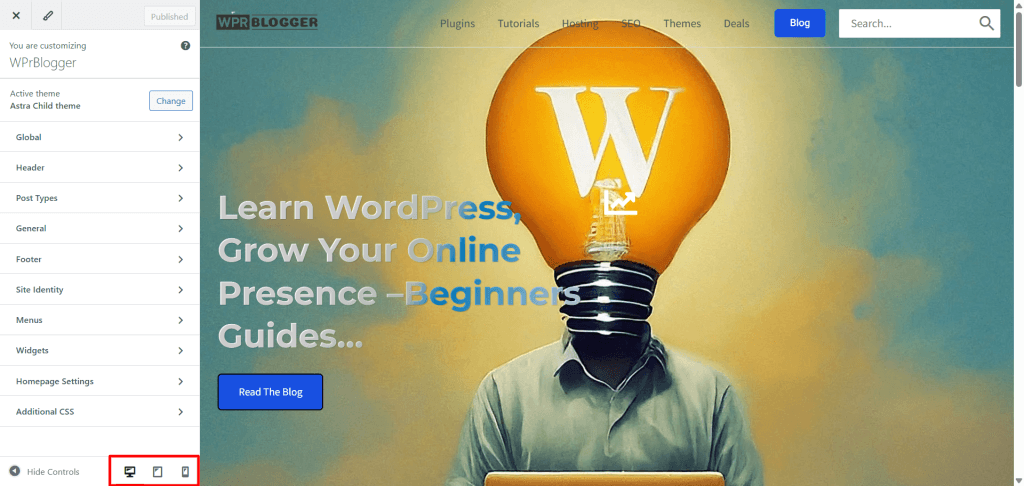
- Preview on mobile and desktop: At the bottom of the Customizer, you can switch between desktop, tablet, and mobile previews to view how your site appears on various devices.
When you’re happy with your changes, click Publish to make them live. If not, simply hit the back arrow, customize again, or close the panel. Nothing will be saved until you confirm it.
The Customizer is the safest and easiest way to explore design options without worrying about messing up your site. Once you’re comfortable using it, you’ll feel more confident making bigger design tweaks later.
Customize Your Homepage Layout
By default, WordPress shows your latest blog posts on the homepage. That’s fine if you’re running a simple blog, but if you’re building a business site, portfolio, or landing page, you might want a more polished, static homepage.
First, you’ll need to create or select a page for your homepage.
Here’s how you can do that:
- Go to your dashboard → Settings → Reading.
- Under “Your homepage displays,” choose A static page.
- Select which page should be your Homepage and which one should be your Blog (if you plan to have one).
- Click Save Changes.
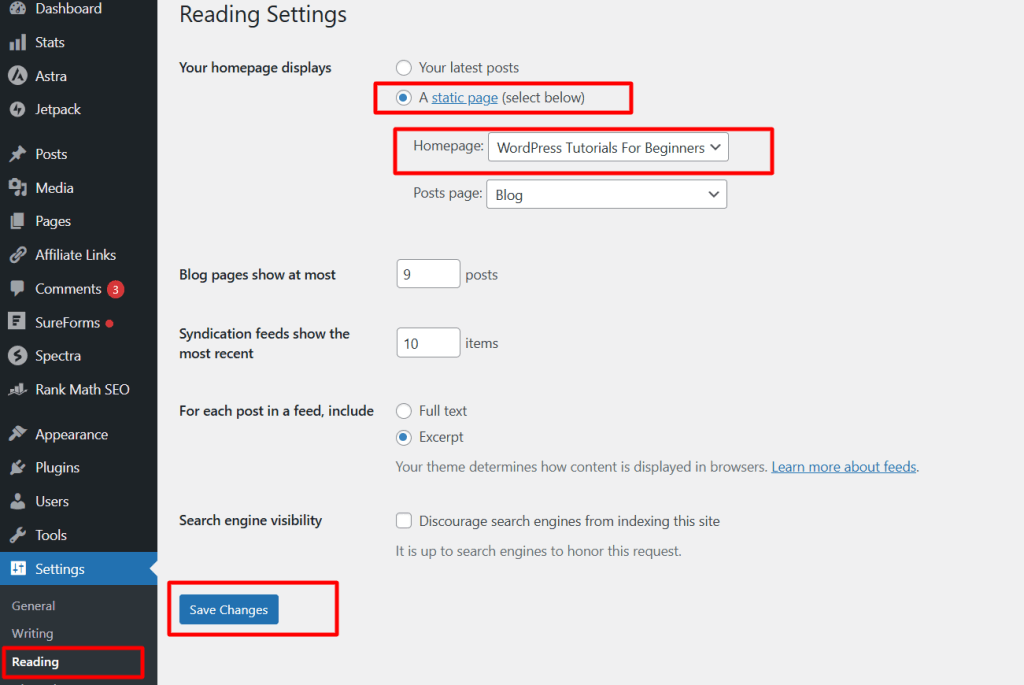
Now, when someone visits your domain, they’ll see your new homepage instead of your latest posts.
If you don’t already have a page to use, go to Pages → Add New, create a page called “Home,” and publish it.
You can do the same for a “Blog” page if you want to keep your posts separate.
Once your homepage is set, you can design it using the block editor (Gutenberg). This editor works like building with digital LEGO blocks. You can add text, images, buttons, and sections in any order you like.
For instance:
- Use a Cover block for a hero section with a background image.
- Add Columns blocks to organize text and images neatly.
- Insert Buttons blocks for calls to action like “Get Started” or “Contact Me.”
If you prefer even more flexibility, consider installing a free page builder plugin, such as Elementor or Spectra. These tools enable you to visually drag and drop elements, making it easy to create a custom layout that suits your style.
Take your time experimenting with different designs. There’s no “right” way to do it. What matters is that your homepage looks clean, loads quickly, and provides visitors with a clear idea of who you are and what your site offers.
Work with the Block Editor (Gutenberg)
The WordPress block editor, often referred to as Gutenberg, is one of the most beginner-friendly tools for customizing your pages and posts. Instead of dealing with code or shortcodes, you build your content by stacking “blocks.”
Each block represents something – a paragraph, image, button, video, column, or even a form. Think of it like building with LEGO pieces. You can drag, drop, and rearrange blocks to shape your page exactly how you want.
To add a new block element, hover over your mouse anywhere on your editor’s page to reveal the “+” icon and click it. Next, use the search bar to find specific blocks (like “image” or “button”). Then click it to add it to the page.

To move a block, hover over it and use the up and down arrows, or simply drag it to a new spot.
Here are some useful blocks for beginners.
- Heading Block: Helps organize your content into sections (H2, H3, etc.).
- Image Block: Easily add and resize images, and set alignment and captions.
- Button Block: Add call-to-action buttons that link to other pages or sections.
- Columns Block: Create layouts with multiple columns — great for services, features, or testimonials.
- Group and Cover Blocks: These help you combine multiple elements and add background colors or images for stylish sections.
Note: Your page builder might come with some or all of these blocks, too, usually, with more customization options.
Each block includes settings in the right-hand sidebar. Depending on the specific block features, you can:
- Change Font size and family.
- Customize color
- Set Padding and margins
- Adjust alignment and background design.
- Add metadata.
If you create a section you love, like a custom call-to-action or footer note, you can save it as a Reusable Block and add it anywhere on your site later. This saves a ton of time.
To view your changes, use the Preview button at the top of the page to see how your design appears on desktop, tablet, or mobile devices. You can also preview how the content will look in an email (desktop, mobile, and tablet).
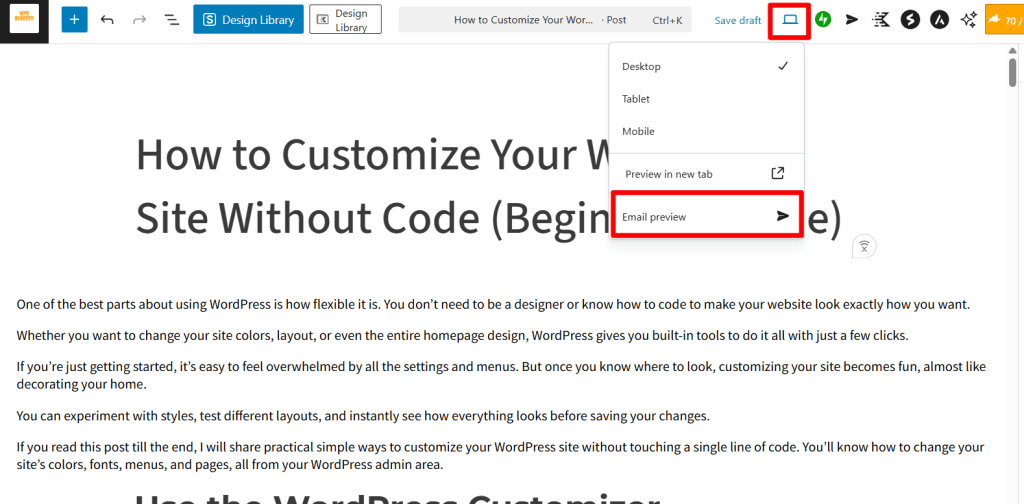
This is good if you have WordPress blog subscribers and automatically send newly published posts to their inbox.
When you’re satisfied, hit the Publish or Update button to save your work.
The block editor gives you complete creative control without touching code. Once you get the hang of it, you’ll be surprised by how professional your pages can look with just a few well-placed blocks.
Adding Widgets and Menus
Widgets and menus are two simple ways to organize your site, making it easier for visitors to find what they need. You don’t have to write any code; just drag, drop, and adjust from your dashboard.
Understanding WordPress Widgets
WordPress widgets are small content blocks that you can place in specific areas of your theme, such as your sidebar, footer, or header. They can display features such as your latest posts, a search bar, social media icons, banner ads, or even a contact form.
To manage your site widget, go to:
Appearance → Widgets (or Appearance → Customize → Widgets)

From there, you’ll see available widget areas (like the main Sidebar or Footer). You can add, remove, or rearrange widgets just by dragging them. You can also add block elements, custom code, an image, and more to a widget.
Here are a few handy widgets for beginners:
- Search: Helps visitors quickly find content.
- Recent Posts: Displays your latest blog posts.
- Categories: Shows a list of your post categories.
- Text or HTML Widget: Great for adding custom messages or shortcodes.
- Social Icons: Adds clickable icons that link to your social profiles.
Some themes and plugins also add their own widgets. For example, a web form widget might come with your theme in the footer or below the content area. You just have to figure out where your theme allows adding a widget and make use of it.
Creating Navigation Menus
Navigational menus are what guide your visitors around your site. A clean, simple menu makes a big difference in user experience.
However, you don’t just create navigational menus; you must also consider how they help users find relevant content on your site. How it guides them towards understanding your site content, archives, and your offerings.
To create one, go to:
Appearance → Menus

Then:
- Click Create a new menu.
- Give it a name (like “Main or Primary Menu”).
- Next, add pages, posts, categories, tags, or custom links from the left side.
- Arrange them by dragging and dropping.
- Choose a Display location (for example, “Primary Menu” for your header).
- Save the menu.
You can also edit menus directly in the Customizer under Appearance → Customize → Menus, where you’ll see a live preview as you add or reorder items.

If you’re using the block editor or a modern theme, you might see a Navigation block instead. This allows you to add and edit menus visually, directly within your page layout.
Pro Tip: Keep It Simple
Don’t overload your site with too many widgets or menu items. Focus on what helps visitors the most, such as quick links to your key pages, a search bar, or your latest posts.
You can see how I keep this site menu focused on helping users find content by categories. This allows you quickly search for relevant content topics. A clean, easy-to-navigate site feels more professional and keeps visitors around longer.
Use a Page Builder Plugin (Optional but Powerful)
If you want even more control over your page design, without touching any code, page builder plugins can make a big difference. These tools utilize a drag-and-drop interface and come with prebuilt design libraries, allowing you to visually build beautiful, professional-looking layouts.
Instead of working inside the default block editor, you can click and drop elements like text boxes, images, buttons, pricing tables, and columns exactly where you want them. It’s fast, intuitive, and perfect for beginners who want creative freedom.
Below is the Kdence Design Library. You can import any of the predesign patterns or pages into your post in one click.

There are several popular page builders; some are beginner-friendly, while others, such as Beaver Builder, require a learning curve to use effectively.
I use both Spectra and Kadence page builders for most of my websites. Both come with a live visual editor, ready-made templates, and hundreds of design widgets (like pricing tables, testimonials, icons, and call-to-action sections).
Their free version covers most of what beginners need, but if you need advanced customization and control, their Pro version is worth trying.
Spectra is great if you’re using the Astra theme, as it integrates seamlessly with the theme since both products are developed by Brainstorm Force.
Elementor and Beaver Builder are more advanced page builders, known for their clean interface and reliability. Although they offer more freedom, customization, and design libraries, they are a better fit for advanced users.
Why Use a Page Builder
There are several reasons to use a page builder, but in my experience, here are the notable:
- Visual editing: What you see is exactly what you get.
- No coding: Ideal for beginners who want custom designs without needing to touch HTML or CSS.
- Reusable templates: You can save designs to reuse later.
- Speed: Create entire pages in minutes instead of hours.
- More Customization: Extend the WordPress design capabilities.
The only thing to watch out for is performance. Don’t overload your site with too many widgets or animations. Stick to clean layouts, and your site will look good and load fast.
Also, watch out for bloated page builders. Some are known for adding unnecessary code, styles, and dragging down your site speed and performance.
Try Pre-Made Templates or Starter Sites
If designing from scratch feels a bit intimidating, you’re not alone. The good news is that many modern WordPress themes now come with pre-made templates or starter sites that you can import in minutes.

These templates are professionally designed and include ready-to-use layouts for homepages, about pages, blogs, service pages, contact sections, etc. The pages, menus, or features you see in your starter templates depend on the niche or industry.
Popular theme creators like Astra and Kadence offer hundreds of free starter templates, built with page builders such as Elementor, Gutenberg, and Spectra.
Once imported, simply replace the demo text and images with your own. It’s one of the fastest and easiest ways to get a professional-looking site without spending hours designing every section yourself.
In fact, I recommend using starter templates if you want to build beautiful pages quickly with minimal effort.
How to Use Starter Templates
First, you need to install a theme that offers starter templates, such as Astra, Kadence, or GeneratePress. Some of these themes provide starter templates as a separate plugin. So you’ll need to install and activate the plugin.
After installation, navigate to the WordPress menu list and locate the “Starter Templates” label. Click it to open the library and browse through the available starter sites. Most are grouped by niche (for example, photography, small business, or online store).
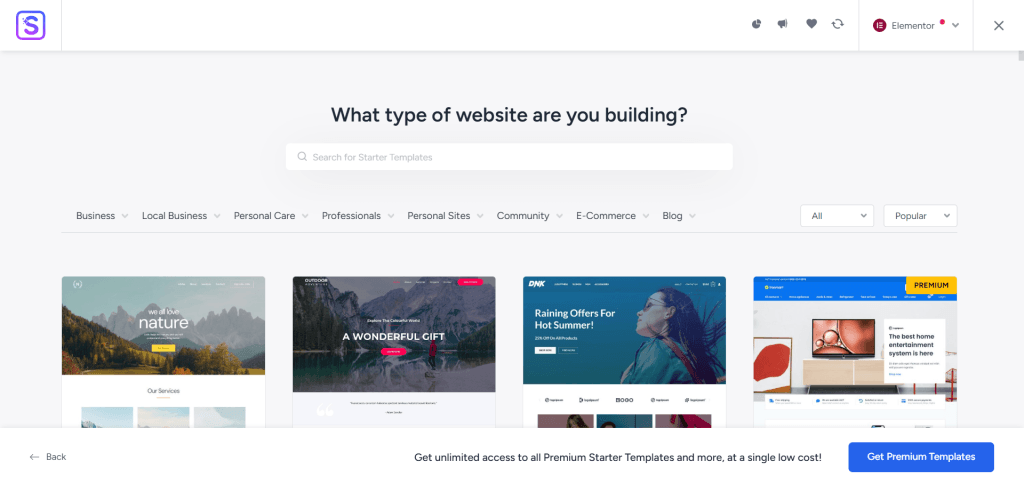
Once you find one that aligns with your site’s mission and design concept, click Import to bring the entire layout, images, content, and structure into your site.
Edit the content with the block editor or your preferred page builder. In just a few minutes, you’ll have a complete, visually appealing site ready for customization.
Themes That Offer Great Starter Templates
- Astra: Offers hundreds of templates for Elementor, Spectra, and Gutenberg users.
- Kadence Theme: Includes fast-loading starter sites and easy global design controls.
- GeneratePress: Focus on being lightweight, performance, and WooCommerce-ready layouts.
- Neve: Lightweight and includes templates for almost every type of business.
Why Use Starter Templates
- You save time — no need to design everything yourself.
- They give you a structure to follow, which is great if you’re new to web design.
- They’re fully customizable — you can change colors, fonts, and layouts anytime.
If you’re building your first WordPress site, importing a starter template is one of the smartest moves you can make. It provides a professional starting point, helping you focus on your content instead of worrying about design details.
Change Fonts and Colors Site-Wide
Your site’s fonts and colors play a significant role in how people feel when they visit. The right combination makes your site easy to read, professional, and consistent.
Your theme comes with its default color and font settings. Thankfully, you can customize these settings across your entire site; no CSS or code needed. And pick something that aligns with your brand’s identity, personality, and website needs.
How to Change Fonts and Colors in WordPress
Go to Appearance → Customize, and look for sections labeled Typography or Colors. Depending on your theme, you’ll see options to:
- Choose a font family for headings and body text.
- Adjust font size, line height, and letter spacing.
- Change text and link colors.
- Set background and accent colors for your site.
Some themes, like Astra, Kadence, and GeneratePress, make this process even easier by offering Global Design Settings. If you use one of these, you’ll see the options to customize color and typography from the Global setting section.

This means you can control your entire site’s color palette and typography from a single location. There is no need to edit each page separately.
Tips for Choosing Fonts
- Keep it simple: Use no more than two fonts — one for headings, one for body text.
- Make it readable: Avoid fancy or script fonts for long paragraphs.
- Use proper contrast: Dark text on a light background is easiest on the eyes.
- Stay consistent: Use the same font styles throughout your site to maintain a cohesive look.
If your theme supports Google Fonts, you’ll have hundreds of options to pick from. Just be careful not to switch too often; consistency builds recognition.
Tips for Choosing Colors
- Pick a main (brand) color: This could be the color in your logo or one that represents your brand’s personality.
- Add an accent color: Use it for buttons, links, and call-to-actions.
- Stick to 2–3 colors: Using too many colors can make your site look messy.
- Check readability: Always make sure text is clear against its background.
If you’re unsure which colors complement each other, try tools like Coolors.co or Adobe Color to generate matching palettes.
Changing your fonts and colors may seem minor, but it can completely transform the overall feel of your website. Take your time experimenting, preview changes before publishing, and don’t be afraid to tweak things until they look just right.
Add Custom Header and Footer
Your header and footer are two of the most important parts of your website. They appear on every page and help visitors navigate easily.
The header typically includes your logo, site title, and main menu, while the footer may contain copyright information, social links, or contact details. Even if you’re new to WordPress, you can customize both areas without touching any code.
Customizing Your Header
Most WordPress themes give you simple tools to customize your header from the Customizer. Typically, this is referred to as the header and footer builder. It utilizes drag-and-drop features, making it easier to add/remove/edit elements as needed.
If you use Astra Pro, the theme I use, you can add features to your header in a three-layer section, using its drag-and-drop builder. This provides you with more room and flexibility to include more information in your website’s header area.

To access your theme header section, go to Appearance → Customize → Header (or something similar, depending on your theme).
From there, you can:
- Upload or change your logo
- Adjust the site title and tagline
- Add or remove navigation menus
- Control the layout (centered logo, logo on the left, etc.)
- Toggle sticky headers, so the menu stays visible as visitors scroll
- Enable transparent header
If your theme supports it, you can even add extras like a search icon, social buttons, or a call-to-action button (“Sign Up,” “Shop Now,” etc.)
Customizing Your Footer
To edit your footer, go to Appearance → Widgets → Footer or open Appearance → Customize → Footer.
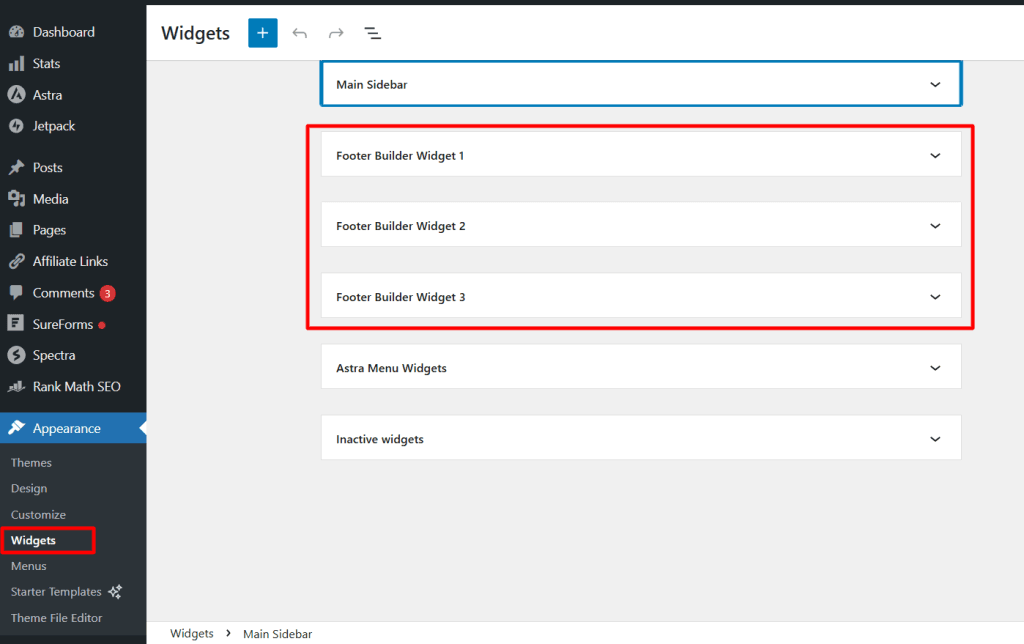
This also depends on your specific theme setup. Once you open the footer section, you can:
- Add widgets like contact info, social icons, or recent posts
- Change background colors and text alignment
- Remove or edit the “Powered by WordPress” text
- Add copyright details or your business name.
If you’re using a page builder plugin, you can design a completely custom footer from scratch, including multi-column layouts, newsletter signup forms, or custom menus.
Quick Design Tips
- Keep your website header clean — too many links can confuse visitors.
- Use your footer for helpful extras, such as a privacy policy, terms of service, or contact details.
- Ensure everything looks good on mobile — test it thoroughly before publishing.
Your header and footer set the tone for your entire site. Once they look good and function well, everything else on your pages will feel more polished and professional.
Final Touches: Favicon, Site Identity, and Footer Credits
Once your site design looks the way you want, it’s time to attend to the small details that make your website feel complete and professional. These are the finishing touches that often get overlooked but make a big difference in how your site looks and feels.
Add a Favicon (Site Icon)
A favicon is the small icon that appears next to your website name in browser tabs, bookmarks, and mobile shortcuts. It’s a simple way to give your site a more branded and recognizable look.
Here’s how to add a favicon to your site:

- Go to Appearance → Customize → Site Identity or Settings → General → Site Icon.
- Look for the Site Icon section.
- Upload a square image (ideally 512×512 pixels).
- Click Publish.
Once saved, refresh your site, and you’ll see your new favicon in the browser tab.

Pro Tip: If you already have a logo, you can crop a small version of it to use as your favicon. You can also use image editing tools like Canva or other online favicon generators to create one.
Edit Your Site Title and Tagline
In the same Site Identity section on the General Settings page, ensure that your Site Title and Tagline are filled in correctly.
- The Site Title is the name of your website.
- The Tagline is a short phrase that describes what your site is about.
These appear in search results and browser tabs, so they’re important for both branding and SEO. Keep them clear and simple. For example:
- Site Title: GreenBite Kitchen.
- Tagline: Healthy recipes made easy
Customize or Remove Footer Credits
Many WordPress themes include a small line of text in the footer that says “Proudly powered by WordPress” or the theme name. You can easily edit or remove it.
To do that:
- Go to Appearance → Customize → Footer.
- Look for an option like Footer Bar or Footer Credits/Copyright.
- Replace the text with your own, such as:
© 2025 Shamsudeen Media. All rights reserved. - Click Publish to save.
If your theme doesn’t offer a built-in way to edit this, you can use a plugin like Remove Footer Credit or create your own footer using a builder plugin like Elementor or Spectra.
Another thing is that you can include an external link in the Footer copyright text. This is ideal for adding affiliate links, service pages, and other relevant content.
Check Your Site on Mobile and Desktop
Before wrapping up, use the preview icons at the bottom of the Customizer to check how your site looks on different devices. Ensure that text is readable on smaller screens and that buttons and links are easy to tap.
Also, ensure all uploaded images resize correctly to fit their containers. These final checks ensure your site looks great, regardless of how visitors access it.
Taking care of these small details gives your site a smooth and professional finish. Once you’ve done this, your WordPress website will look uniquely yours; clean, cohesive, and ready for visitors.
FAQs About Customizing a WordPress Site Without Code
Can I customize my WordPress website without knowing any coding?
Yes, you can. WordPress makes it easy to customize your site using tools like the Customizer, the block editor (Gutenberg), and drag-and-drop page builders like Elementor or Beaver Builder. You can change colors, fonts, layouts, and even entire designs without writing a single line of code.
What’s the difference between the WordPress Customizer and the block editor?
The Customizer helps you change your site’s overall design for things like colors, fonts, headers, and menus. The block editor (also called Gutenberg) helps you design the actual content on your pages and posts by adding and arranging text, images, buttons, and more. They work together to give you full control over your site’s look and layout.
Do I need a special theme to customize my WordPress site easily?
You don’t need a special theme to design your site. Although some themes are more beginner-friendly than others. Popular options like Astra, GeneratePress, and Kadence offer powerful customization controls and work well with page builders. These themes let you adjust almost everything, including layouts, spacing, and typography, without touching code.
How can I ensure my design appears well on mobile devices?
Always preview your changes before publishing. Most modern themes and page builders have responsive options, so you can switch between desktop, tablet, and mobile views inside the editor. You may need to adjust spacing, font sizes, or image sizes for mobile users to make everything look clean and easy to read.
Do I need premium plugins to customize my site?
Not necessarily. Many free plugins can help you customize your site effectively. However, premium plugins often offer more design options, templates, and support. You can start with free tools, then upgrade later as your site grows or your needs become more advanced.
Conclusion
Customizing your WordPress site without coding is easier than most beginners think. With the Customizer, block editor, and drag-and-drop page builders, you have all the tools to design a site that fits your style and purpose.
Don’t worry about getting everything perfect right away. Start small by tweaking your colors, adding your logo, and adjusting your homepage layout.
As you get comfortable using these tools, you’ll naturally pick up new design skills and learn what works best for your site.
What matters most is creating a site that’s simple to use, loads fast, and clearly represents your brand or message. Once you hit “Publish,” you’ll see how rewarding it feels to bring your vision to life, all without touching a single line of code.


