As a beginner, one of the basics of WordPress to learn is how to install WordPress plugins. It’s not a complex process. After reading this tutorial, you can install and activate WordPress plugins in different situations.
There are over 60,000 WordPress plugins – free and paid – and I will show you how to access them in this guide.
You will learn how to install the free WordPress plugins and download and install premium plugins.
However, before we dive into how to install WordPress plugins, let me ask you a question. Are you a wordpress.com user?
Can I Install Plugins on Free WordPress?
You can not install plugins if you’re using the free wordpress.com blog. You only have access to the pre-install plugins.
The plugin menu is not available for free users of wordpress.com
You can, however, install third-party plugins if you upgrade to the business plan, which costs $25/month. But if you’re on a self-hosted WordPress blog, there are no limitations to what you can and can’t do with your blog.
You can install third-party plugins or themes as you want. Being self-hosted means you are responsible for your site’s resource usage.
So, there are no restrictions on what you install, delete, hide, or unpublish from your site.
Guide to Install WordPress Plugins
This guide will cover installing plugins in WordPress using the built-in search function and the uploading method.
We will go over the two processes, but first, let’s start with how to add plugins to WordPress sites using the built-in search function.
Step 1. Log in to WordPress Admin
Login to WordPress admin from the sidebar menus, locate plugins, hover your mouse over it, and click on add new from the options.

Step 2. Search For Your Plugin
Enter the plugin name in the search box on the next open page. You can search by the plugin, Author name, tag, or keyword.
For example, suppose you want to search for an eCommerce plugin but don’t know its name, or you want to compare different options.
In that case, you can enter keywords like “shop,” eCommerce, store, etc…the search result will contain plugins categorized as eCommerce.
Here is a search result for WordPress plugins categorized as “form.” To use the search operator, click the drop-down menu icon at the right of the search form.

You can also search for plugins based on
- Popularity.
- Favorites
- Featured
- Recommended
Step 3. Install The Plugin
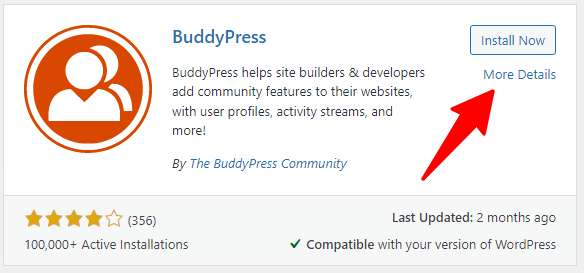
Once you’ve found the plugin you want to add to your WordPress sites. The next thing is to install it on your blog. You will see the Install Now button at the top right.
WordPress will fetch and install the plugin on your site when you click the install button.

But before you install a WordPress plugin on your site, there are certain things to consider:
- Plugin Description
- Last Updated Time
- Compatible with your current WordPress version
- User review
You must review these checklists to determine whether the plugin is worth adding to your site.
Some plugins were last updated more than two years ago.
Such plugins can cause compatibility issues with your current WordPress version. It could also affect themes and other plugins or even break your site if installed.
So, before you install a WordPress plugin, click on the “More Details” button. The link is underneath the “Install Now” button to learn more about the plugin.
It will save you from installing potentially harmful plugins that may break your WordPress blog.

You need to read other user experiences, too. From reading other users’ plugin experience, you can determine if the plugin is what the author says it is.
For example, read through the user review in the image below. You can see that the plugin is not the best.

Step 4. Activate The Plugin
Once the installation is complete, the next thing is to activate the plugin. You need to click on the “Activate” button to do this.
And that’s it! You’ve just learned how to install and activate plugins on WordPress sites.

You can proceed to apply the necessary settings if required. Some WordPress plugins don’t need further settings to work.
They just quietly work in the background of your site to perform their task.
Some plugins require extra configuration to work. In this case, you need to pay attention to the plugin documentation or look through the settings page on the menu list.
Installing Paid WordPress Plugins
Now, let’s look at how to install a paid WordPress plugin.
The process differs slightly because paid-only WordPress plugins are inaccessible through WordPress.org or your admin search function.
Here are the steps to add a premium WordPress plugin to your site.
Step 1. Purchase the Plugin
The first step is to purchase the plugin license from the developer. If the plugin has a different license category, you must buy the license that suits your business needs.
For example, the WP Rocket WordPress cache plugin has three paid licenses. Each license gives you different plugin usage but the same features.
The difference in the license is the number of sites the plugin can be installed.
Some plugins have different pricing based on the available features, the number of installed websites, priority supports, white labels, etc.
You must review the plugin specification to determine the license that best fits your situation.
Once you decide what to buy, create an account and pay for the plugin. You now have access to the plugin download file.
Step 2. Download the Zip File
After creating your account, you must download the plugin to your computer in a zip file. For most plugin merchants, you can not directly upload to your WordPress site.
Step 3. Upload to Your WordPress Site
To upload the plugin zip file from your computer to your WordPress blog, go to the WordPress admin menu, hover on plugins, and click “Add New.”

On the next page, click the Upload Plugin button.

Next, click on “Choose file” in the page’s panel.

Locate the plugin zip file from your computer folder, and click to upload to your WordPress blog. Next, click the install button in the panel to begin the uploading process.
Depending on your network quality, the process shouldn’t take more than a minute to complete.

Step 4. Activate The Plugin
When the upload is complete, you need to activate the plugin just like we did with the free plugin activation via the WordPress search form.
But this time, you will see an interface similar to the one you have below. Click the “Activate Plugin” button, and your paid WordPress plugin will be active on your site.

The process described above is for paid plugins that are unavailable via wordpress.org. But what if you’re upgrading from the lite version to a paid plan?
In this case, you already have the plugin installed on your site; you must enter the license key in the required field to activate your license.
You don’t need to go through this process again.
FAQ – How to Install WordPress Plugins
Can I install any WordPress plugins?
You can install any plugin on your blog if you’re on a self-hosted wordpress.org platform. Users on the free wordpress.com platform can not install plugins unless they upgrade to the business plan, which costs $25/month or $299/yr.
How do I activate a plugin in WordPress?
Follow the steps guide described in this post to activate a plugin in your WordPress blog.
How do I manually install a WordPress plugin?
First, download the plugin zip file from the source URL to your computer. Go to WordPress admin, hover on plugins, and click on add a new plugin. Next, locate the plugin file from your computer, click upload, and click Install from the panel. After the installation is complete, click Activate the plugin.
Conclusions…
With our tutorial, you’ve learned how to install plugins in WordPress. As you can see, it is not a difficult process to complete.
Whether installing from the WordPress.org directory, WordPress admin, or the developer website, installing and activating the plugin on your site shouldn’t take more than a minute.
If you want more WordPress tutorials like this, kindly subscribe to our newsletter. So, you can always be the first to learn about new blog post updates.


