Search engine visibility is crucial for any website owner who wants their content to be seen. An essential factor in achieving this is a little tag called “noindex.” This tag instructs search engines not to index a specific page or your entire website.
While it has its uses, sometimes a noindex tag might be applied unintentionally, preventing your website or specific pages from being indexable and displayed in search results.
This guide will walk you through the steps of identifying and sharing three methods to remove noindex tags in WordPress, ensuring your website has the best chance of ranking well in search engines.
This is because if a webpage cannot be indexed, it does not stand a chance of ranking in SERPS.
As a reminder, you should not set the no-index tag for any webpage you want to index and rank in SERP.
What is the Noindex Meta Tag?
The noindex meta tag is a piece of code or an HTML tag inserted into the webpage’s HTML file, instructing search engines not to index that specific page. This means the page won’t be indexed or appear on search engine results pages (SERPs).
Think of it as a way to tell search engines, “This page isn’t important for search, so please don’t include it in your index.” In other words, I don’t want this page or post to show up in your search engines, so don’t even bother indexing it.
The noindex meta tag is helpful for various reasons, like hiding private pages, logins, membership areas, or content with low-value benefits for searchers. Marketers often use the no-index tag to hide WordPress pages they don’t want the public to access without permission.
Let’s learn how to remove the no-index meta tags from your WordPress site.
Identifying Affected URLs
First, you must identify affected website pages, posts, or the entire website if it is set to no-index. This will allow you to find the right solution to the problem because the fix for a site-wide no-index might differ from that for individual pages and posts.
Depending on where it is set, the no-index tag can be implemented in several ways within WordPress. It mainly affects the entire site or individual pages and posts.
Another thing is to be sure these pages are not intentionally hidden from search engines. If a page is intentionally hidden from search engines, indexing it is unnecessary. Doing this will open up the page for indexing and make it appear in SERP.
Whatever the case, follow the instructions below to remove noindex tags in WordPress.
1. Inspecting Theme’s Header.php File
The no-index tag can be accidentally or unintentionally added directly to your theme’s code, specifically within the header.php file.
This is a less common scenario, but if you’ve exhausted other options or suspect this might be the case, you can follow these steps (Note: This method involves editing code, so proceed with caution if you’re not comfortable with coding)
- You need to access your website’s files through an FTP client such as FileZilla or a file manager provided by your hosting company.
- Locate the folder containing your theme’s files. The theme folder name might vary depending on your WordPress theme, but it’s usually within the wp-content/themes directory.
- Find the File named header.php.
- Download the header.php file to your computer.
- Open the downloaded File in a text editor (like Notepad or TextEdit).
- Search for the code snippet <meta name=”robots” content=”noindex, follow”>. A noindex tag is applied to your website if this code exists.
If you’ve followed the steps described and found the <meta name=”robots” content=”noindex, follow”> code snippet in your header.php file, then fixing the problem is quite simple.
Here’s what you must do to remove the noindex tag:
- Open the edited header.php – Make sure you have the downloaded and edited version of header.php in your text editor.
- Delete the Code Snippet – Locate the exact line containing the code <meta name=”robots” content=”noindex, follow”>. Simply delete this entire line of code.
- Save the Changes – Once you’ve removed the code, save the edited header.php file.
- Upload the File Back – Use your FTP client or file manager to upload the edited header.php file to the same location on your website (usually wp-content/themes/your_theme_name).
Removing the noindex code automatically sets the page to index, making it eligible for crawling and indexing.
2. Removing Noindex Tag From Individual Pages/Posts
Some popular WordPress SEO plugins, like Yoast SEO and RankMath SEO, allow you to control the robots’ meta tag index settings on individual pages and posts. This is the simplest way to remove the no-index tag in WordPress from the block editor screen.
If you’re using an SEO plugin, consult its documentation to see how to manage no-index tags within its settings.
The process is almost the same for all the SEO plugins. So, I will use Rank Math to show you how to remove noindex for individual posts and pages and set it to index so that search engines can crawl, index, and serve the page on SERP.
Log in to your WordPress dashboard and open the posts or pages you want to set to index. You can also do this for a new post you’re writing.
This process also allows you to set a post or page to noindex if you don’t want it to appear in search engines, such as a thank you page, unsubscribe pages, password-protected pages, etc.
So, after opening the post in the WordPress block editor, locate the RankMath SEO toolbar at the top right corner.
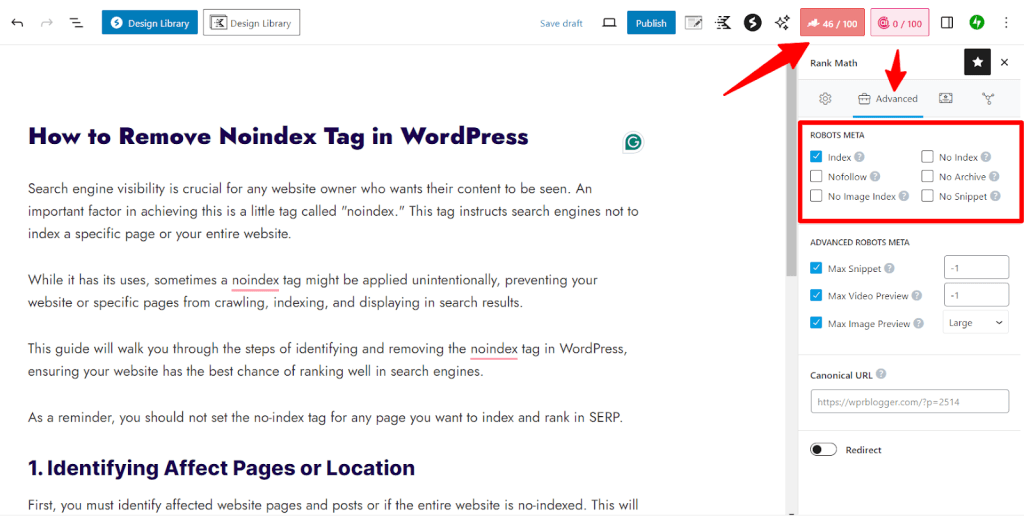
First, click the RankMath SEO score button. Next, click the Advanced tab. This action should open the meta robots tags setting for that page.
What you need to do here is to check the Index box. The noindex checkbox will automatically be unchecked when you check the index box.
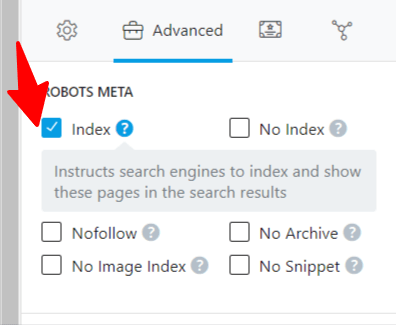
You can set other robot meta tags for individual posts and pages using the Rank Math SEO plugin to instruct search engines on how to treat the page.
You can set meta tags for:
- No follow – This tag instructs search engines not to follow the links on the page. (Search engines can honor or ignore the rules.)
- No Archive – You use this tag to instruct search engines not to keep and serve a cached copy of that particular page.
- No Snippet – Search engines will not show a description or snippet of text in the SERP for the page. This also instructs the No Archives tag.
- No Image Index – Tells search engines not to index images found on the page.
While these robot meta tags have their use cases, it’s best to leave the default setting in Rank Math if you don’t know what you’re doing.
3. Removing The Noindex Tag Sitewide
As explained above, removing a noindex tag from the entire site requires a different approach. Here, we will look at how to do so. This option is valid if you’re sure the noindex tag is applied to the entire site.
Log in to your WordPress dashboard and navigate to Settings > Reading. Scroll down to the section titled Search Engine Visibility. Look for the checkbox labelled “Discourage search engines from indexing this site.“

If this box is checked, a no-index tag is applied to your entire WordPress website, preventing all pages from being indexed. You must uncheck the box and click the Save Changes button to remove the tag.
Though search engines might ignore the no-index tag, even if the option is checked and still crawls and indexes your site, it’s best to uncheck it if you want your site visible in search engine result pages.
Remember, this method only removes the noindex tag from the entire site; it does not override the meta tag settings for individual pages.
If you have pages or posts tagged with no index, you must go into that specific post to remove the tag. In this case, read the step guide at #2.
What Next After No-Index Tag Removal?
After removing the noindex tag, it won’t reflect immediately on search results pages. Search engines need time to re-crawl and index your website.
The time it takes for search engines to re-index your website can vary. Depending on your website’s size and crawl frequency, it could be a few days or even a few weeks.
However, you don’t need to wait for search engines; you can help speed up the process.
One thing you can do is use the URL inspection tool in Google Search Console. This tool allows you to submit any URL from your website to Google for crawling and indexing.
Log in to your GSC account and click the URL inspection tool from the left menu.
Enter your website URL or the exact page URL (in the case of individual posts) in the tool. If available, Google will attempt to retrieve the indexing data from its index.
Whatever the result, use the “Test Live URL” option on the page to let Google re-crawl the URL and determine if the page can be indexed without errors and appear in its search engine.
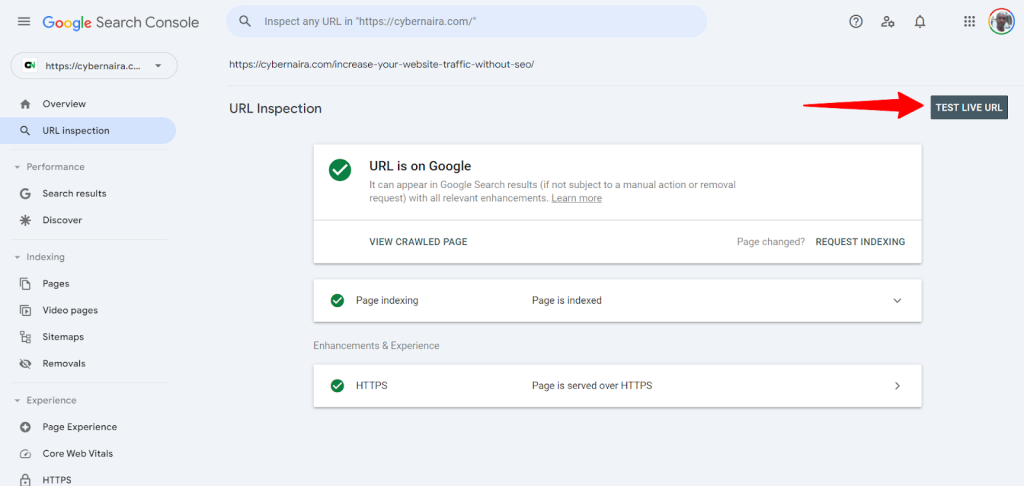
Next, click the “Request Indexing” option on the page. This instructs Google that the page has changed and should be considered for re-indexing.
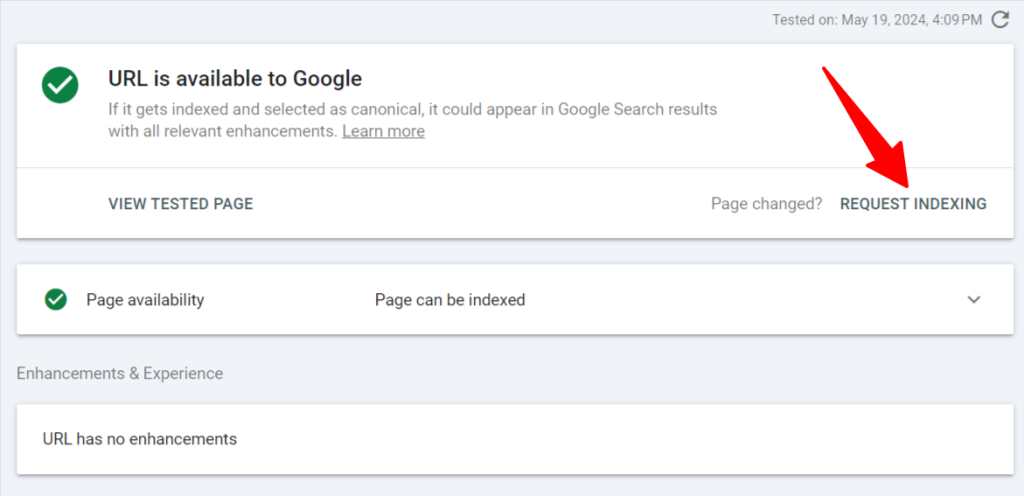
As mentioned earlier, it might take several hours, days, or weeks for Google to crawl and index the page. At this point, you can do little to speed up the process. Everything is now in Google’s hands.
From this moment, keep an eye on or monitor the Search Console indexing status to know when the page has been indexed. Alternatively, you can search for the exact URL in Google search.
Use the Site Search operator to look it up:
Site:https://yoursitename.com/ (This should be the inspect URL in GSC)The URL will show up in SERP if Google has its index.
Conclusion
Removing a no-index tag from your WordPress website can be straightforward. The first and most essential step is to identify the affected URL(s); once you do that, follow the abovementioned methods.
You can instruct search engines to index your webpage and improve your website’s visibility in search results.
If you prefer the theme header editing option, remember to back up your files before making any changes, and be patient, as it might take some time for search engines to recrawl and update their indexes.
You should explore the SEO plugin settings you’re using. They might offer a more user-friendly way to manage noindex tags for specific pages or your entire site.


