
Spam does not hit every WordPress site the same way. A personal blog mostly deals with comment spam. A WooCommerce store deals with fake reviews and fraudulent orders. A membership site deals with fake registrations trying to get past a paywall.
Most guides on WordPress spam protection hand you one long checklist and let you figure out which parts apply to you. This one starts by helping you figure out your site type, then walks you through exactly what to fix, in order, without pushing you toward one plugin brand.
Quick answer: what spam protection do you actually need?
| Your site type | Priority fixes |
|---|---|
| Blog with comments open | Discussion settings, comment moderation, a spam filter plugin |
| Site with a contact form | Honeypot/token protection, timing checks, a spam filter plugin |
| WooCommerce store | Review moderation, coupon restrictions, fraud screening on checkout |
| Membership or course site | Email confirmation on signup, login attempt limiting, registration screening |
| Any site on shared hosting without Cloudflare access | .htaccess rules, XML-RPC lockdown, a lightweight firewall plugin |
Use the table of contents to jump to the sections that matter, then read the rest when you have time. Every setting below is free unless we say otherwise.
1. Comment spam: turn on WordPress’s built-in defenses first
An open comment section with no controls turns into a dumping ground for bot-posted links within days, and every one of those links sits on your site, associating it with pill sites, gambling pages, and worse.
Fixing this protects your reputation with readers and keeps search engines from seeing your comment section as a spam magnet. Before installing anything, use what is already sitting in your dashboard.
In your WordPress dashboard, go to Settings » Discussion.
Before a Comment Appears. Check “Comment must be manually approved” so nothing goes live without your eyes on it first.

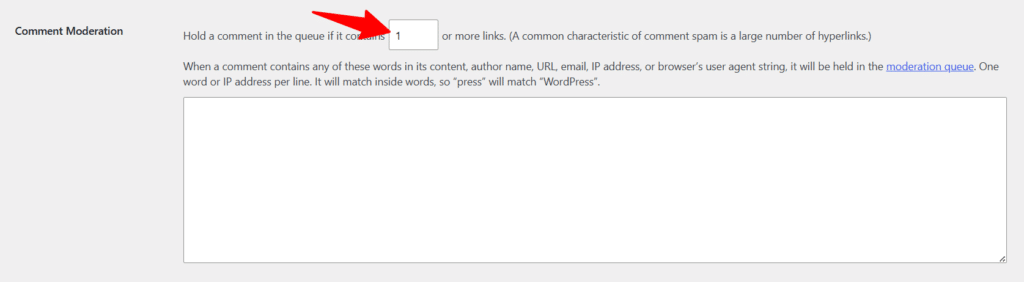
Lower the link threshold. Spam comments almost always carry links. Under “Comment Moderation,” set the field to hold a comment if it contains 1 or more links, not the default 2.
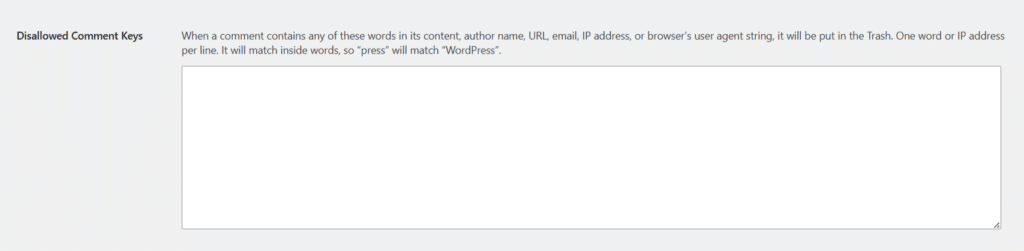
Build a blocklist. In “Disallowed Comment Keys,” paste common spam phrases, sketchy TLDs like .xyz or .top, and known spammer email domains, one per line.
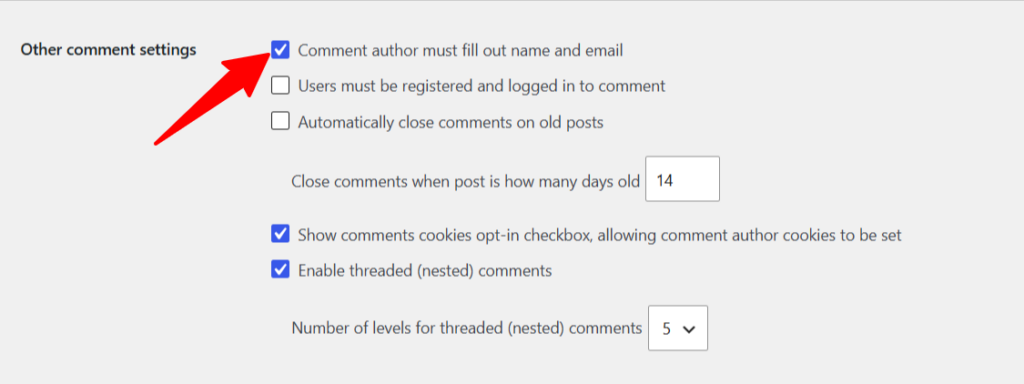
Require a name and email. Check “Comment author must fill out name and email” under “Other comment settings.” This alone filters out a large share of bot-generated drive-by comments.
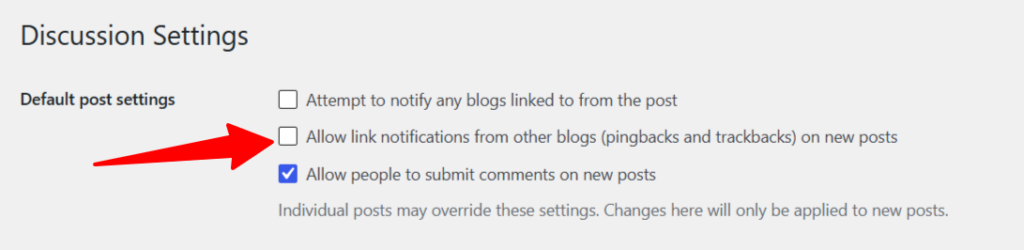
Turn off pingbacks and trackbacks. These were built for cross-blog conversation and are now almost entirely used for spam and, in some cases, to enlist your site in a DDoS attack against someone else. Uncheck “Allow link notifications from other blogs” and save.
If you do not need comments at all, disabling them completely removes this entire category of spam. The cleanest way is a simple PHP snippet added through WPCode or any other script management plugin, rather than editing your theme directly, so a theme update never brings comments back on:
add_filter('comments_open', '__return_false', 20, 2);
add_filter('pings_open', '__return_false', 20, 2);
add_filter('comments_array', '__return_empty_array', 10, 2);
If you use Astra Pro, you can set this code to run only on a specific post type and user role. This gives you more granular control over where and which user roles trigger custom script runs on your site.
2. XML-RPC and REST API abuse
This is the spam type most site owners never even hear about, which is exactly why it does the most damage.
XML-RPC and the REST API let automated tools test hundreds of username and password combinations in a single request instead of one at a time through your login page. A successful brute-force here does not just add junk content; it can hand an attacker full access to your site.
Closing this off removes one of the most commonly automated attack paths on all of WordPress, regardless of how small or new your site is.
If you do not use the WordPress mobile app or an external app that connects through XML-RPC, disable it entirely. Add this snippet through WPCode:
add_filter('xmlrpc_enabled', '__return_false');If your host gives you access to .htaccess, you can block the file outright, which stops the requests before WordPress even loads:
<Files xmlrpc.php>
Order Deny,Allow
Deny from all
</Files>
The REST API can leak usernames the same way. If you are not running a headless setup or relying on a plugin that needs open API access, you should restrict /wp-json/wp/v2/users/ from anonymous requests.
Most security plugins have a one-click toggle for this under a “hardening” or “REST API” section, so check there before writing custom code.
NOTE:
The two PHP snippets above (disabling comments in section 1, and disabling XML-RPC in this section) are PHP code, not HTML or JavaScript, so they cannot go in a header or footer script box. Add each one in WPCode as a new PHP Snippet, with “Insert Location” set to Run Everywhere, then activate it. You can also add PHP snippets like these to your child theme’s functions.php file, but WPCode is safer since a theme update or theme switch won’t wipe it out.
The .htaccess block that blocks xmlrpc.php at the server level is different: it’s an Apache directive, not PHP, so it goes directly into your site’s .htaccess file through your hosting file manager or FTP. Place it above the line that reads #BEGIN WordPress. This only works on Apache or LiteSpeed servers. If your host runs Nginx, this block does nothing, so rely on the PHP snippet above instead and skip this one.
3. Pick one spam filter plugin, and know your real options
Relying on manual moderation alone does not scale. Once your site gets any real traffic, spam volume grows fast enough that reviewing every comment or form entry by hand becomes a part-time job, and things start slipping through the cracks either way.
An automated filter catches the bulk of it invisibly, so your time goes into your content instead of your spam folder.
Every one of these plugins runs quietly in the background and works across comments, and most also cover contact forms once you connect them.
| Plugin | Free tier | Needs API key/account | Best for |
|---|---|---|---|
| Jetpack (Akismet built in) | Yes, generous free tier for personal sites | Yes | Sites already running Jetpack for backups or stats |
| Akismet (standalone) | Free for non-commercial sites; paid for business use | Yes | Personal blogs with light comment volume |
| CleanTalk | Limited free trial, then paid | Yes | Sites wanting a single dashboard across comments, forms, and registrations |
| Antispam Bee | Fully free, no account | No | Privacy-focused sites, or anyone who wants zero data leaving their server |
NOTE
If you are already using JetPack for site stats, downtime monitoring, or backups, its built-in Akismet integration means you do not need a second plugin at all. This gets overlooked constantly because Jetpack is filed under “performance” in most people’s minds, not “spam protection.”
Whichever you pick, install only one. Running two spam filters at the same time causes conflicts and can start blocking real visitors.
4. Comment spam power tips
Even with a filter running, the most persistent spam is written to mimic a real comment closely enough to slip past automated checks, and it’s this remaining layer that either gets caught by extra friction or ends up published under your name. These tips close that last gap without adding much work.
Here are a few steps to follow:
Add a free CAPTCHA. Cloudflare Turnstile is free with no request cap and does not ask visitors to solve anything in most cases. Install a Turnstile plugin, connect your free Cloudflare account, and switch it on for comments.
Restrict comments to logged-in users, but only if you run a membership site, course platform, or private community. On an open public blog, this adds friction most casual readers will not bother with, so lean on your spam filter instead.
Remove the website URL field from your comment form. Spammers comment for the backlink. Take the field away, and a big share of the incentive disappears with it. The tradeoff is a sharp decline in engagement, but that’s fine. Genuine readers will read and leave comments, anyway.
5. Contact and lead form spam
A flooded contact form buries real customer inquiries under hundreds of junk submissions, and it’s easy to miss a genuine lead because you stopped checking the inbox carefully after the tenth fake one that day. Fixing this keeps your form doing its actual job: connecting you with real people.
Whatever form builder you use, whether that’s WPForms, Fluent Forms, or NinjaForms, check for these three settings specifically:
If you’re on a Turnstile paid plan, adding a keyword deny list and blocking specific email domains cleans up what’s left.
6. Registration spam vs. login attacks (these are different problems)
Fake accounts and brute-force login attempts look similar on the surface but cause different damage, so they need different fixes.
Left alone, fake registrations bloat your user database and throw off every metric you track, while brute-force login attempts put your entire site at risk if one ever succeeds. Treating them as one problem means neither gets properly solved.
Registration spam is fake sign-ups clogging your user list. Fix it by requiring email confirmation before an account activates, so a bot that cannot check an inbox never finishes signing up.
Where this setting lives depends on your email marketing platform, WooCommerce, a membership plugin, or a form builder’s registration add-on, so check your specific tool’s settings before installing anything extra.
Login brute-forcing is a different threat: repeated password guesses against your existing accounts, usually through wp-login.php or XML-RPC (see section 2 above). Limit login attempts with a lightweight plugin, and rename your login URL away from the default if you want an easy extra layer.
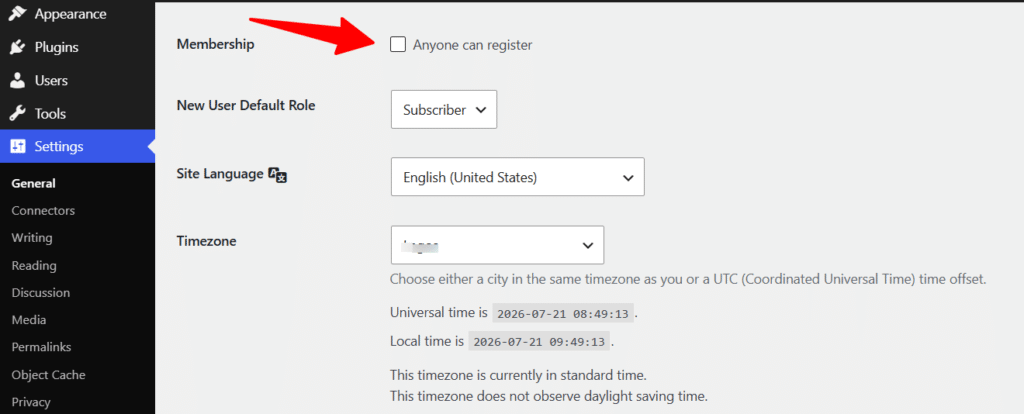
If you don’t need open registration at all, turn it off under Settings » General by unchecking “Anyone can register.”
7. WooCommerce-specific spam
Store spam costs actual money, not just cleanup time.
Fake reviews mislead shoppers and can tank trust in your entire catalog; coupon abuse quietly drains your margins every time a scraped code gets reused thousands of times. Fraudulent orders trigger chargebacks that cost you the product, the shipping, and a chargeback fee on top.
Locking these down protects revenue directly, not just tidiness. Now, let’s deal with them:
Fake product reviews. You must require a verified purchase before a customer can submit a review. Moderate reviews the same way you moderate comments, since WooCommerce reviews run through the comments system by default.
Coupon abuse. Set usage limits per coupon and per customer, and avoid store-wide public codes you have not restricted. These get scraped and shared on coupon-aggregator sites within days.
Fraudulent orders. Enable your payment gateway’s built-in fraud screening (most major gateways include this free), and consider requiring account creation instead of guest checkout if fraudulent orders become a recurring problem. However, you must weigh this option against the checkout friction it adds for real customers.
8. Add a site-wide firewall, with a fallback for shared hosting
Everything above deals with spam after it reaches your site. A firewall stops a large share of it before it ever gets there, which matters because the automated traffic hitting your login page and forms all day is also the traffic straining your server resources and slowing your site down for real visitors.
A DNS-level firewall like Cloudflare’s free plan filters malicious requests before they reach your server at all, which is the most effective layer here. Setup means pointing your domain’s nameservers to Cloudflare.
If you use Cloudflare CDN, your domain is already pointing to its nameservers.
However, if you don’t want to use Cloudflare CDN or changing your nameservers isn’t practical right now, a plugin-based firewall still helps, and the .htaccess snippet in section 2 covers the highest-value fix (XML-RPC) without touching your DNS at all.
9. Cleanup and an ongoing routine
Spam that’s already blocked but never deleted still costs you: a bloated spam folder and thousands of fake accounts slow down your database. A filter left completely unattended eventually lets a false positive bury a real customer or reader without you noticing.
A short recurring routine keeps everything above actually working instead of quietly decaying.
Back up your site before deleting anything in bulk. These actions do not have an undo button.
Clear your spam folder under Comments after a quick scan for anything real that got caught by mistake.
Remove fake Subscriber accounts under Users, filtered by the Subscriber role, since that’s the role almost every registration bot defaults to. Never touch an Administrator account during this cleanup.
Set a recurring monthly check: scan for false positives, empty the spam folder, and glance at new registrations for gibberish usernames or throwaway email domains.
FAQs
Conclusion
Spam protection isn’t one setting you switch on once. It’s a handful of small, targeted fixes, each aimed at a specific entry point: comments, forms, registrations, XML-RPC, and if you run a store, checkout and reviews too.
You don’t need every fix in this guide on day one. Go back to the table at the top, match it to your site type, and start there.
A blog owner gets the biggest win from comment moderation and one spam filter plugin. A store owner gets more value from locking down reviews and coupons first.
Everyone, regardless of site type, benefits from the XML-RPC fix in section 2, since it takes minutes and closes off an attack path that has nothing to do with what kind of site you run.
Work through the priority fixes for your site type first, then circle back for the rest when you have time. None of it requires a paid tool to get meaningfully safer than an unprotected default WordPress install.