
I have tested a handful of WordPress migration plugins over the years, including All in One WP Migration and UpdraftPlus.
Both work, but both also run into the same wall on larger sites: file size caps (free plan), server timeouts, or a restore process that stalls halfway through.
After running several WordPress site migrations, Migrate Guru has become my default choice. I walk you through my exact process in this Migrate Guru tutorial, along with the cleanup steps that nobody mentions until your site starts throwing fatal errors on the new server.
Why Migrate Guru Handles Large Sites Better
Most migration plugins run the entire transfer through your own server’s PHP process. That means your host’s execution time limit, memory limit, and upload size limit all apply to the migration itself.
If your site has a large media library or a bloated database, the migration can simply time out before it finishes.
Migrate Guru, which is built by BlogVault, works differently. Once you kick off the migration, the heavy lifting happens on BlogVault’s own servers rather than your hosting account.
That is why you can watch the site migration move through tens of thousands of files without your source or destination server choking.
It also explains why the plugin does not need you to babysit a browser tab open the entire migration time.
Before You Start: A Quick Pre-Migration Checklist
Do not skip this part. A few minutes here save hours later.
Step 1: Install Migrate Guru on Both Sites
Install and activate the Migrate Guru plugin on the source site (the one you are migrating from) and on the destination site (the one you are migrating to).
Click “Yes, I’ve installed it” on both sites.
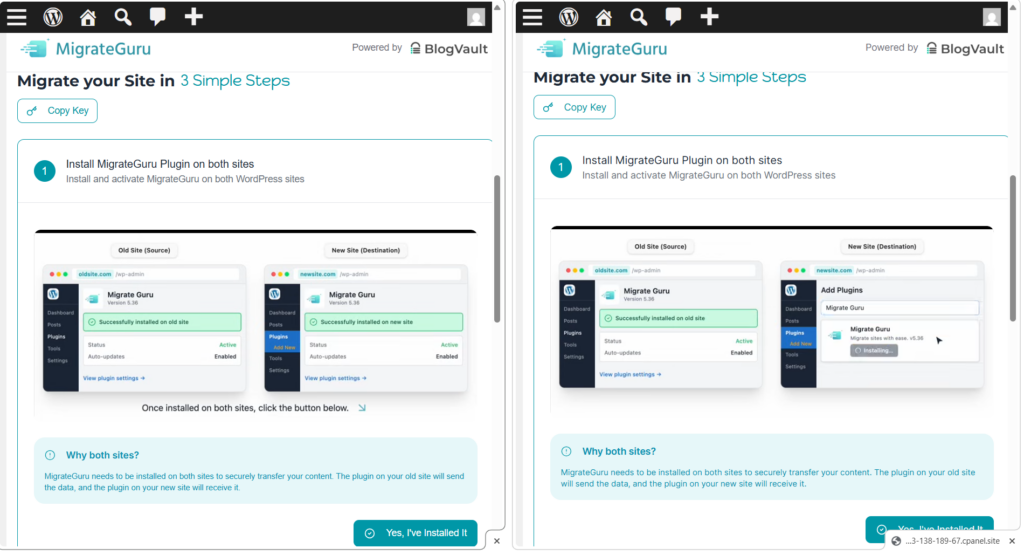
The Migrate Guru dashboard will confirm once you’ve installed and activated the plugin on both sites, showing a green “Installed on both sites” status.
Step 2: Copy the Migration Key from the Destination Site
This is the step that trips people up most often, so pay attention to which site you are on.
On the destination site, look at the top of the Migrate Guru screen and copy the migration key.
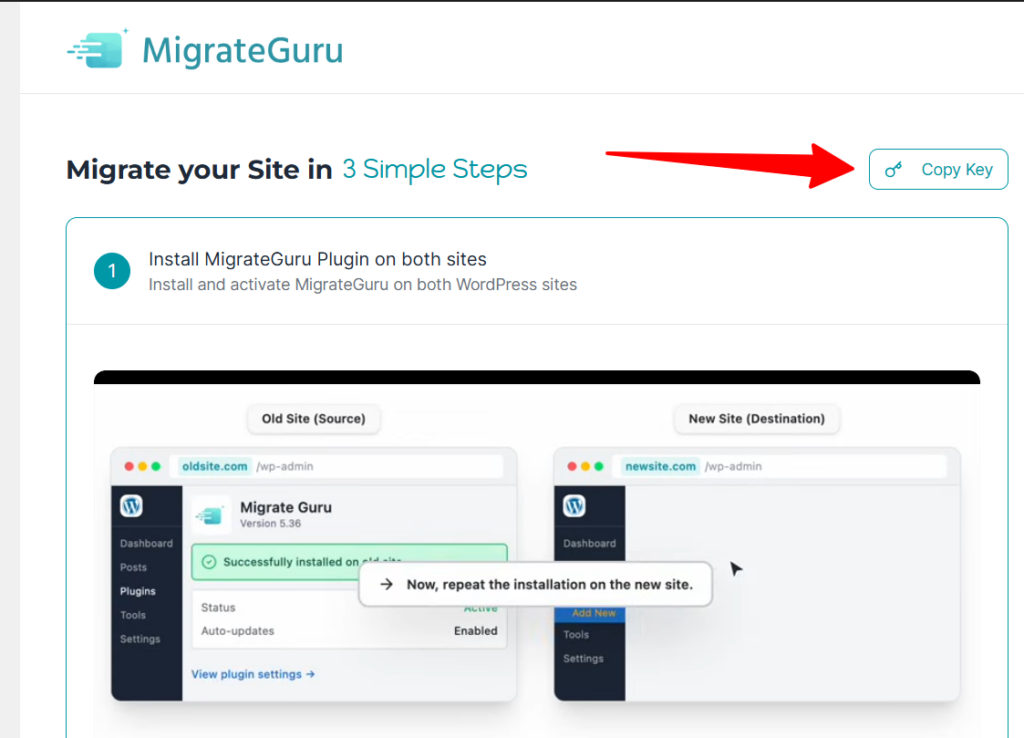
The plugin will show a pop-up confirming, “we assume this is the site you’re migrating to,” along with a warning not to paste the same key back into step 2 on that site.
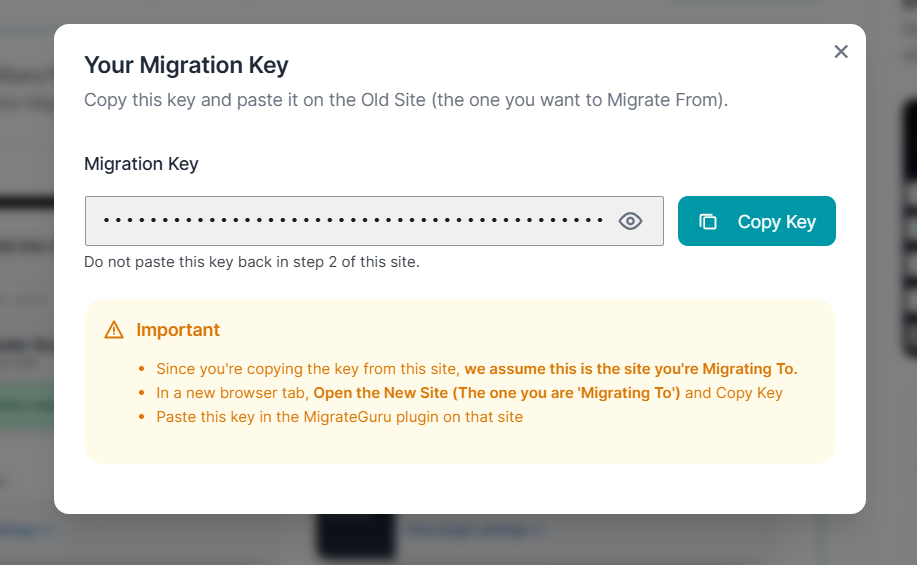
This warning exists for a reason. If you accidentally grab the key from the wrong site or paste it into the wrong field, Migrate Guru will reverse the sites and try to migrate in the opposite direction.
Switch to the source site, paste the key into the migration key field, and click Validate Key. Once validated, the plugin confirms the key with a green checkmark and moves you to step 3.
Step 3: Review the Migration Overview Before You Commit
This step matters more than it looks. Before you click “Initiate Migration,” Migrate Guru displays a Migration Overview panel with two boxes: “Migrating From” (your old site) and “Migrating To” (your new site), each showing the corresponding domain or temporary URL.
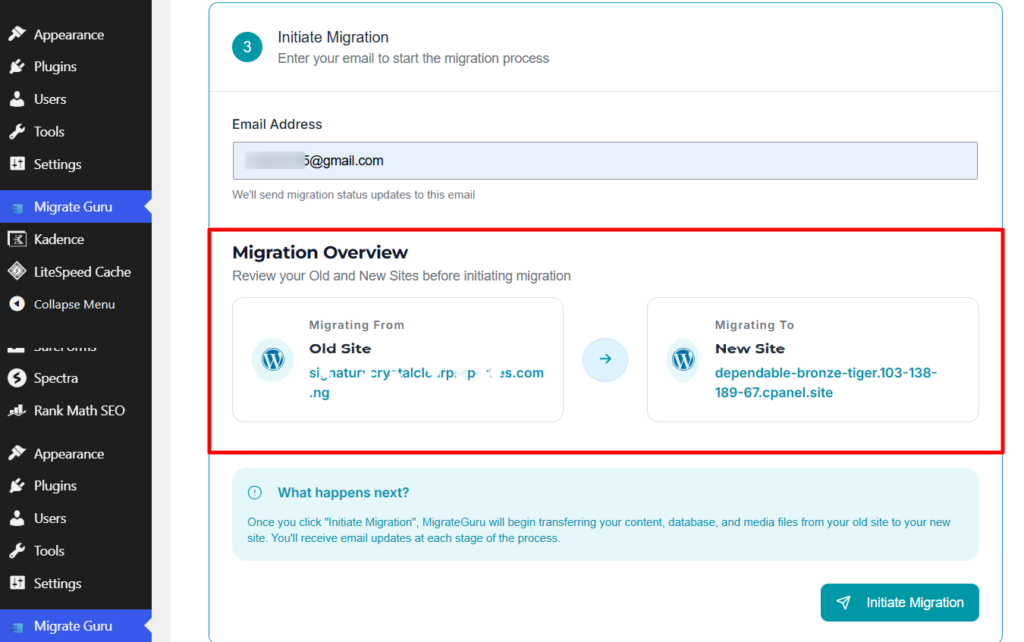
Read both boxes carefully. Double-check that the “Migrating From” domain is genuinely your source site and the “Migrating To” domain is your intended destination, whether that is a live domain or a temporary staging URL like a .cpanel.site address.
This is your last chance to catch a reversed connection before any data moves. Once you confirm this looks correct, enter your email address (Migrate Guru sends status updates here) and click Initiate Migration.
Step 4: Let the Migration Run
Once migration starts, you will see live progress: total file size transferred, table count, and a running file counter (something like “Migrating Site (Copying Files 5000 / 17726)”).
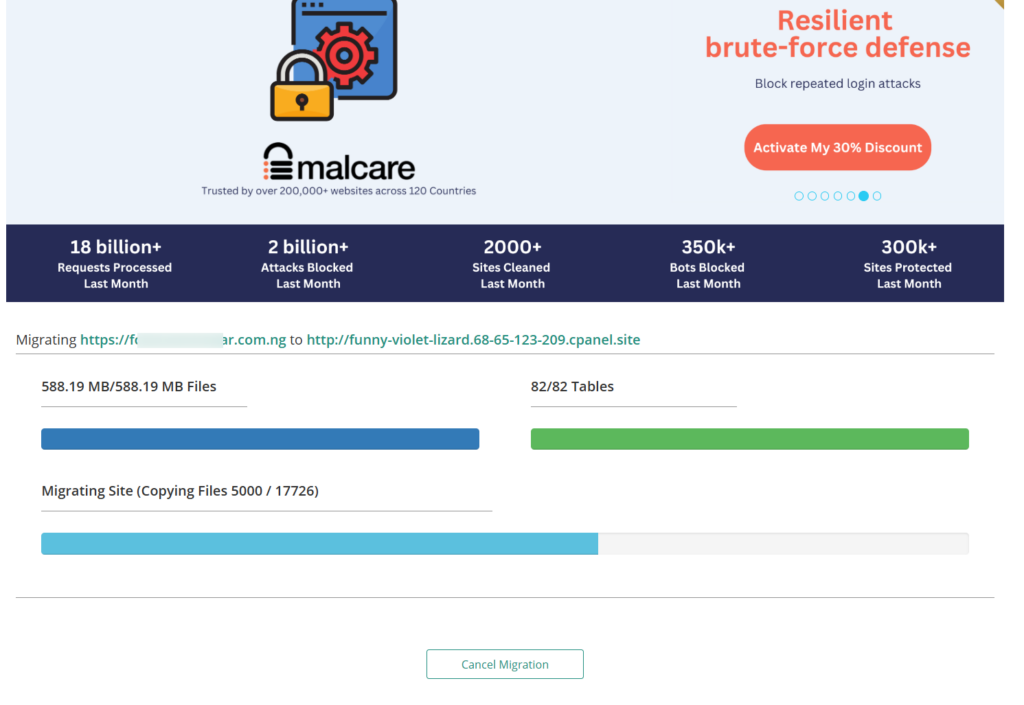
Depending on the site’s size and your connection, this can take anywhere from a few minutes to over an hour, especially for larger sites with large media libraries.
You do not need to keep the tab open the whole time since the migration runs on Migrate Guru’s infrastructure, but I usually leave it running in the background so I can catch any errors immediately.
Step 5: Confirm the Migration Completed and Test the Temporary URL
When the migration finishes, you see a “Migration Completed Successfully!” confirmation that includes the source URL, an arrow, the destination URL, and a “Visit Site” button.
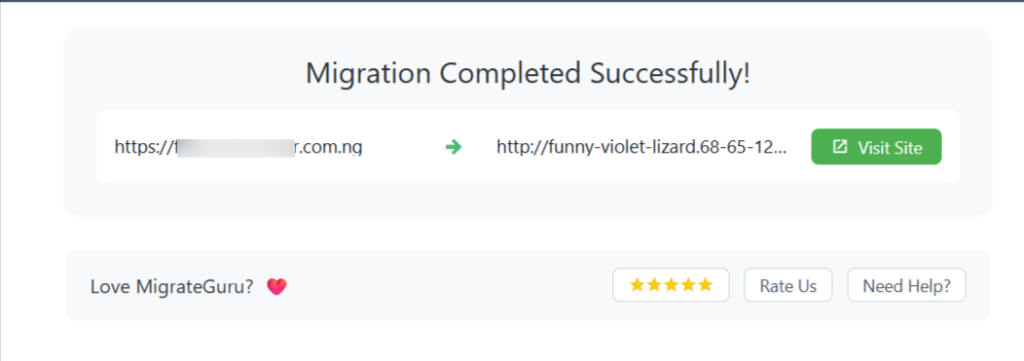
Click through and actually browse the new site on its temporary URL before touching DNS. Check the homepage, a few inner pages, the contact form, and anything dynamic like a shopping cart or membership login.
This is the point where problems tend to surface, usually in one of two ways: a white screen, a fatal PHP error or a site that loads but looks visually broken (missing styles, broken images, mixed-content warnings).
Step 6: Fix Fatal Errors and Plugin Conflicts First
If the site throws a fatal error or a white screen on the temporary/destination URL, the culprit is almost always a plugin that does not play well with the new server environment, whether that is a different PHP version, a different web server (Apache versus LiteSpeed or Nginx), or a caching plugin trying to write to a path that does not exist on the new host.
To fix this:
- Log in to cPanel or your custom dashboard on the destination server.
- Open the Softaculous plugin manager (or use File Manager, or FTP/SFTP) and deactivate all plugins at once. Bulk-renaming the plugins folder or individual plugin folders works if Softaculous is unavailable.
- If deactivating plugins does not restore wp-admin access, use WordPress’s link recovery mode. WordPress sends an automatic email with a recovery link when it detects a plugin causing a fatal error, and that link lets you deactivate the offending plugin directly from the dashboard even if the site is otherwise inaccessible.
- Once you can log into wp-admin normally, reactivate plugins one at a time, reloading the site after each one. The plugin that breaks the site will show itself immediately. Note it, and either update it, replace it with an alternative, or leave it deactivated until you can troubleshoot it with the plugin developer.
Step 7: Clean Up the Database Before You Touch DNS
Here is the part that is easy to get backwards, and getting the order wrong is exactly what causes a “working” temporary site to break the moment you point the real domain at it.
While your migrated site is still living on the temporary URL, browsing it, testing it, and reactivating plugins can cause some plugins and page builders to write that temporary domain into the database. Either into cached page data, widget settings, or theme options that store absolute URLs instead of relative ones.
If you skip cleaning this up and go straight to a DNS switch, you end up with a live site on your real domain that still has broken links, images, or scripts pointing at the old temporary .cpanel.site address.
So the order should be:
- Install a Search and Replace plugin (or use WP-CLI’s search-replace command if you have shell access, which is faster and more reliable for large databases).
- Run a search-and-replace pass to catch any staging or temporary URL fragments that were written into the database during testing, replacing them with your real, final domain rather than the temporary one. Search for every variation you can think of: http:// and https:// versions, with and without www, and the raw temporary domain itself.
- Check wp-config.php on the destination site for hardcoded WP_HOME or WP_SITEURL constants. If either is defined there, it overrides whatever is in the database, and a search-and-replace alone will not fix it. Update these manually to your real domain.
- Clear any caching plugin’s cache (WP Rocket, LiteSpeed Cache, Breeze, whichever you are running) after the search and replace, since a cached version of the page with the old URLs baked in will otherwise keep serving stale content.
Do this cleanup while the site is still isolated on the temporary URL. You want the database fully pointed at the correct final domain before that domain is actually live and receiving real traffic.
Step 8: Update DNS to Point to the New Server
Once the site is clean and tested on the temporary URL, update your domain’s DNS records, typically the A record, to point to the new server’s IP address.
If you are also changing hosts entirely (not just servers within the same host), you may need to update nameservers instead of just the A record, depending on how the new host manages DNS.
After updating, wait for full propagation before moving to the next step. Propagation can take anywhere from a few minutes to 24-48 hours depending on your previous TTL setting and your visitors’ DNS resolvers.
You can check propagation status with a DNS lookup tool to see whether the new IP is resolving globally before assuming the switch is complete everywhere.
Step 9: Reinstall or Reissue an SSL Certificate
Many hosts auto-provision a free SSL certificate (typically Let’s Encrypt) once they detect that the domain is resolving to their server, but this usually only happens after DNS has propagated.
Check your destination host’s SSL status once propagation is confirmed, and manually trigger a certificate issue if it has not happened automatically. Do not skip this step. A site that goes live without HTTPS working correctly will throw browser security warnings immediately.
Step 10: Add Your CDN Only After DNS Has Fully Propagated
If you are planning to run the site behind Cloudflare, QUIC.cloud, or a similar CDN, add it only after DNS propagation is confirmed, and SSL is working correctly on the new server.
Adding a CDN before the domain is fully pointed to the new server, or before SSL is issued, tends to create its own layer of SSL and caching headaches that are harder to diagnose because you are troubleshooting DNS, SSL, and CDN caching issues simultaneously rather than one at a time.
Step 11: Final Post-Migration QA and SEO Checklist
Once the domain is live on the new server with SSL and CDN (if applicable) in place, go through this checklist before considering the migration done:
A Quick Note on Migrate Guru vs UpdraftPlus vs All in One WP Migration
Based on my testing, UpdraftPlus is solid for scheduled backups and smaller restores, but I have encountered upload size limits and timeouts when using it for a full site migration on shared hosting.
All in One WP Migration works well until you hit its file size cap on the free version, and the premium extensions to remove that cap add up in cost if you only migrate occasionally.
Migrate Guru is free regardless of site size, and because it processes the transfer on its own servers rather than yours, it has been the most reliable option for me on larger sites with a lot of media files or a heavy database.
Final Thoughts
Migrate Guru handles the actual file and database transfer reliably, but the migration itself is only half the job.
The real risk sits in the cleanup: plugin conflicts on the new server, leftover staging URLs in the database, and a DNS or SSL sequence done out of order.
Get the order right (test on the temporary URL, fix plugin conflicts, clean the database, then switch DNS, then add your CDN), and the migration should go live without the client, or your own site, noticing anything happened at all.